Payroll Management#
This manual outlines the navigation and functionalities available within the Payroll module of the system
The Payroll module provides access to various functionalities related to employee compensation and financial management.
To acces the payroll sections;
Locate the Payroll icon (represented by a wallet) on the left sidebar menu.
Click on the Payroll icon to view the following sections;
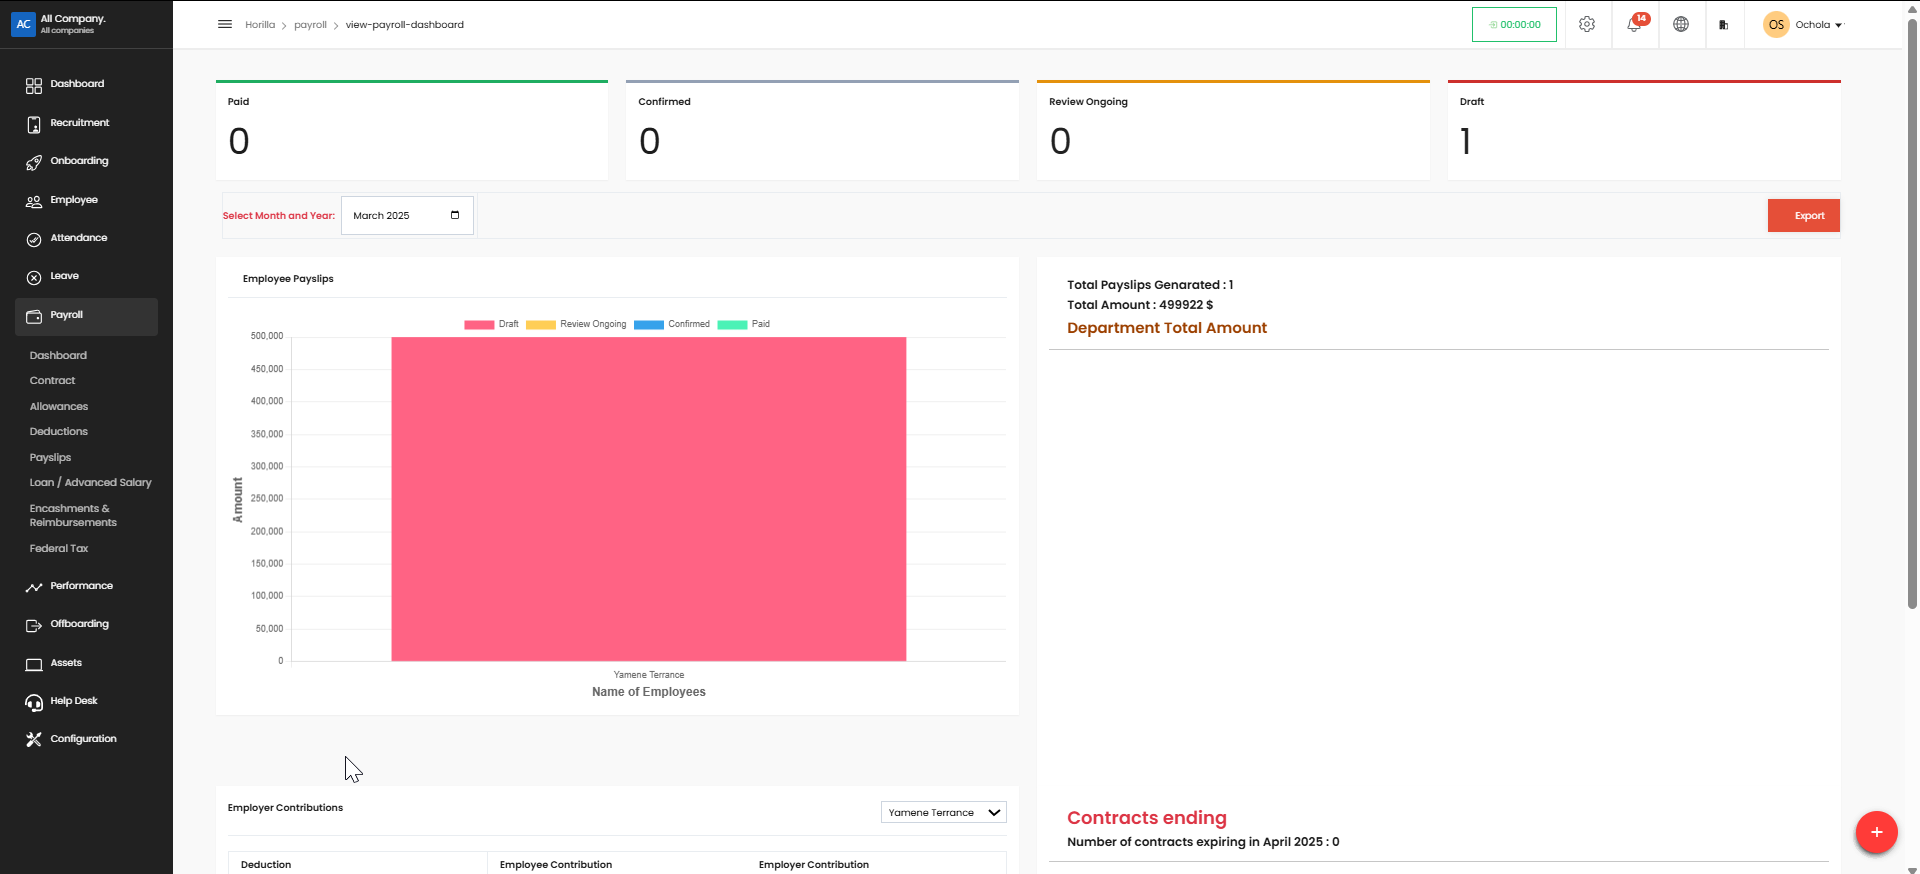
Dashboard#
Provides an overview of payroll-related information, potentially including summaries, charts, and key performance indicators.
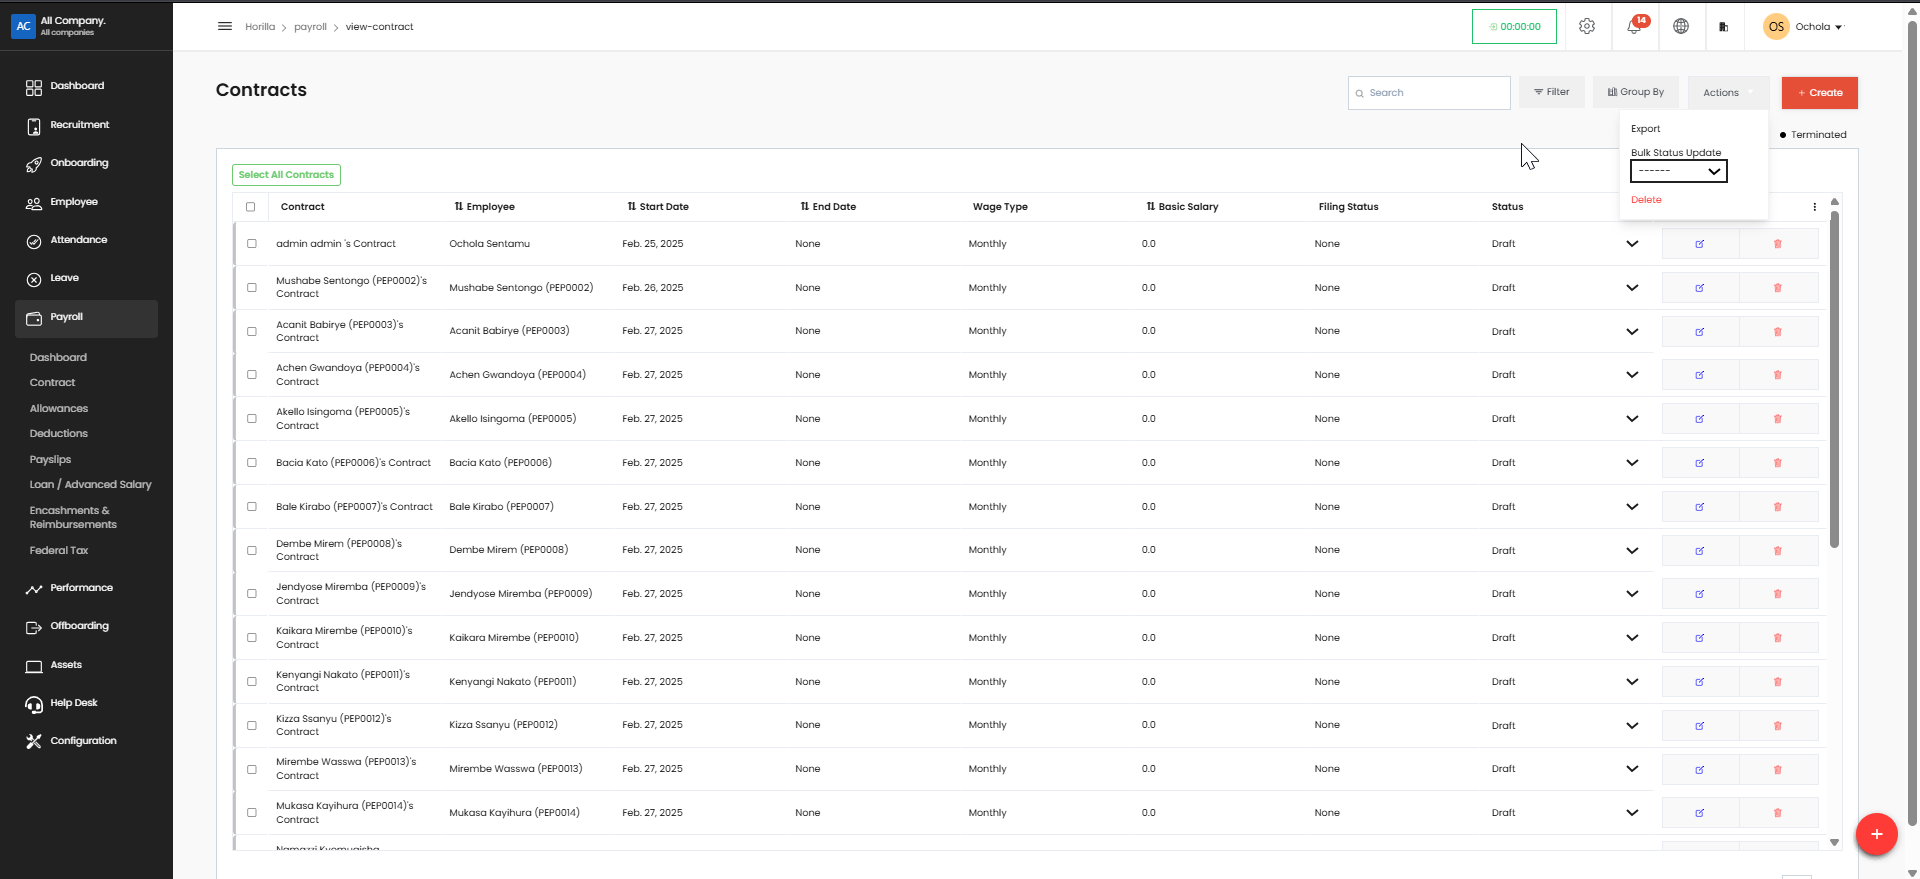
Contract#
This section Manages employee contracts, potentially including details such as salary, benefits, and employment terms.
Creating a Contract#
Navigate to the Contracts section and click the + Create
Filling the Contract Form:
The Contract form collects essential employee contract details.
You'll need to accurately input information regarding:
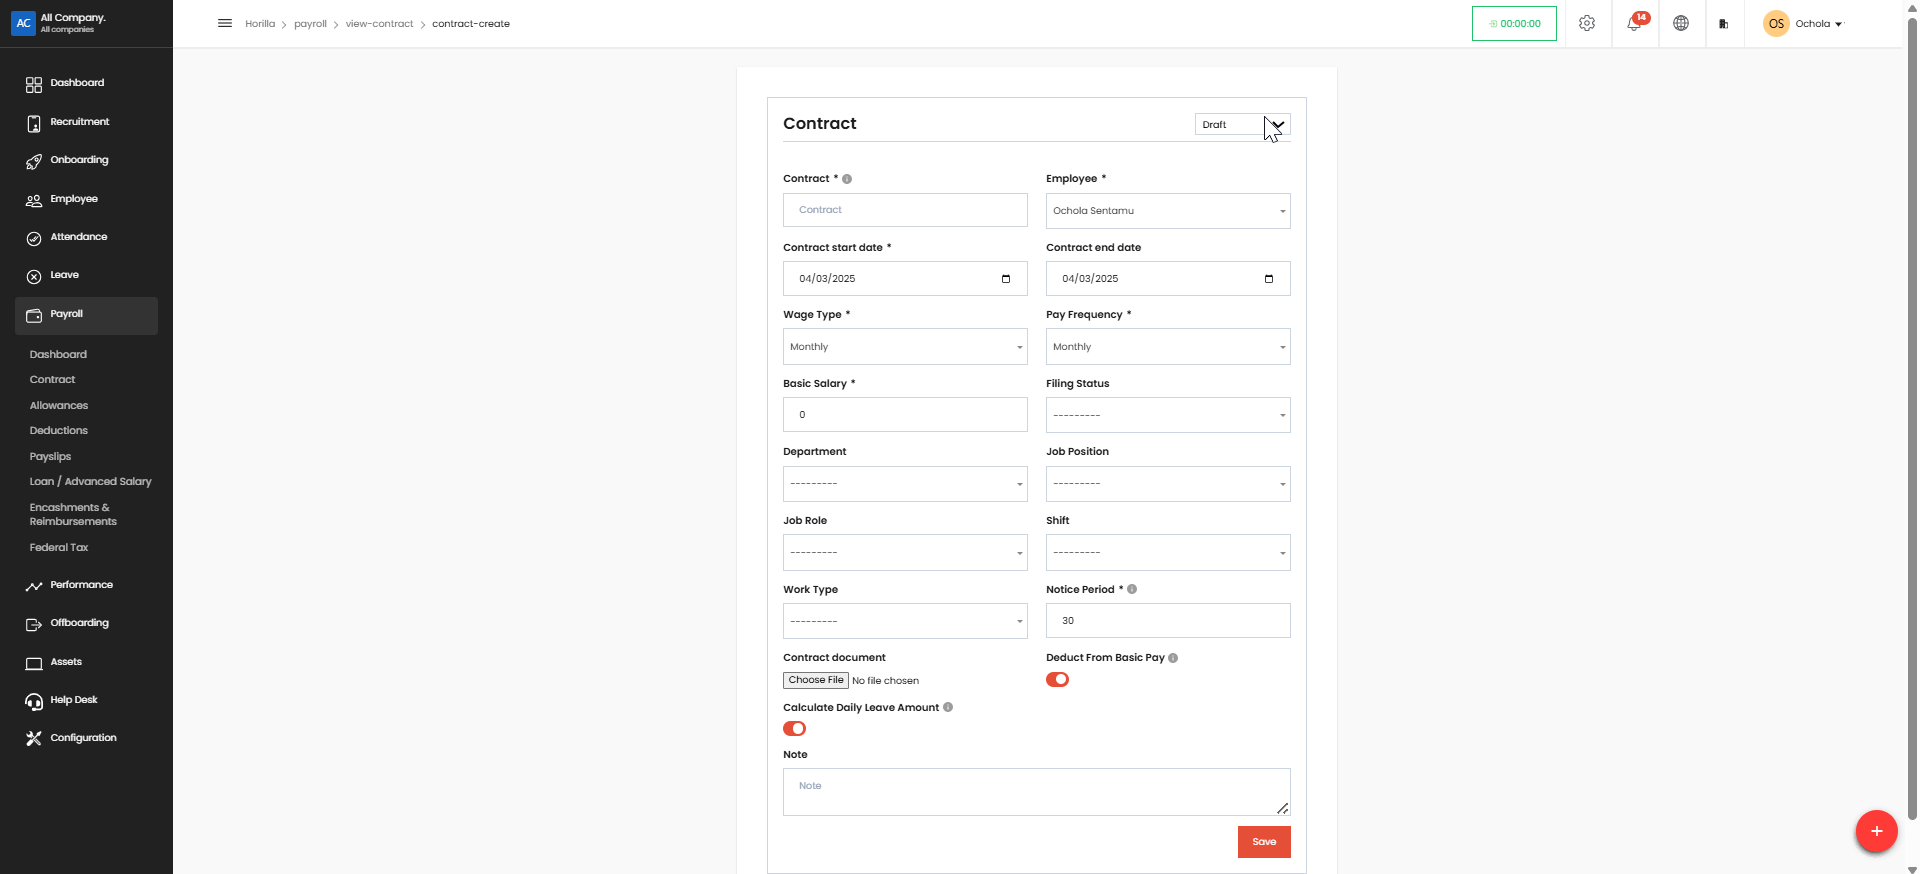
Employee Identification: Linking the contract to the correct employee.
Contract Terms: Specifying start and end dates, wage type, pay frequency, and basic salary.
Employment Details: Including department, job function, role, shift, and work type.
Legal and Administrative Information: Such as filing status, notice period, and any relevant contract documents.
Payroll and Leave Settings: Configuring tax deductions and leave calculations.
Additional Notes: Adding any relevant comments or context.
Key Considerations:#
Pay close attention to mandatory fields (marked with an asterisk).
Ensure accuracy when selecting options from dropdown menus.
Double-check all numerical entries (salary, notice period).
Attach any required contract documents.
Once all necessary fields are completed, click the "Save" button to finalize the contract creation.
Allowances#
Handles the administration of employee allowances, such as housing, transportation, or other benefits.
Accessing the "Allowances" Page:#
Log in to your account on the system.
Navigate to the Payroll section from the left-hand navigation menu.
Click on the Allowances option within the Payroll menu.
Creating a New Allowance:#
Click the "Create" button (located at the top right). This will open a form to create a new allowance.

Fill in the required fields in the form. This will likely include:
Allowance Name: A descriptive name for the allowance.
Amount: The monetary value of the allowance.
One Time/Recurring: Select whether the allowance is a single payment or a recurring one.
Taxable: Indicate whether the allowance is subject to taxes.
Start Date: The date when the allowance becomes effective.
Potentially other relevant fields depending on your system configuration.
Click the "Save" or "Submit" button. This will create the new allowance and add it to the list.
Viewing Existing Allowances:#
The "Allowances" page displays a list of existing allowances.
Each allowance entry shows key information such as:
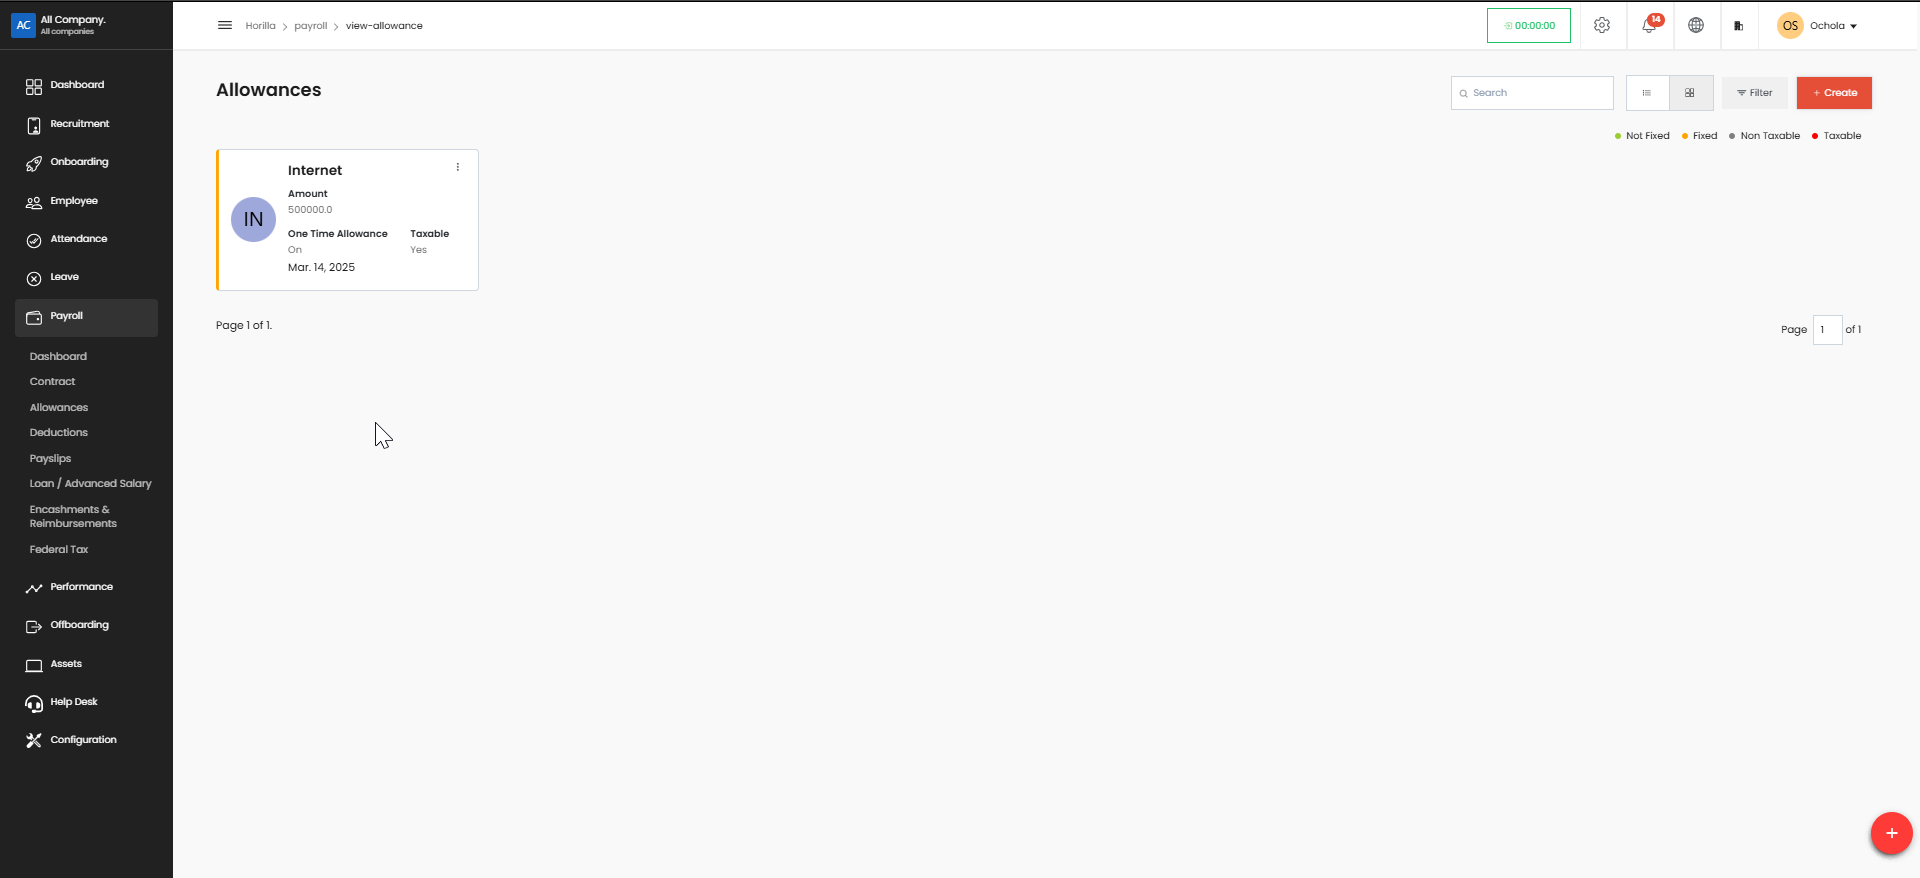
Allowance Name: (e.g., Internet)
Amount: The monetary value of the allowance.
One Time/Recurring: Indicates whether the allowance is a single payment or a recurring one.
Taxable: Shows whether the allowance is subject to taxes.
Start Date: The date when the allowance becomes effective.
Filtering and Searching Allowances:#
Search Bar: Use the search bar (located at the top right) to find specific allowances by name.
Filter Button: Click the "Filter" button (located next to the search bar) to apply filters based on criteria like:
Taxable: Filter allowances based on their taxability.
Recurring/One Time: Filter allowances based on their payment frequency.
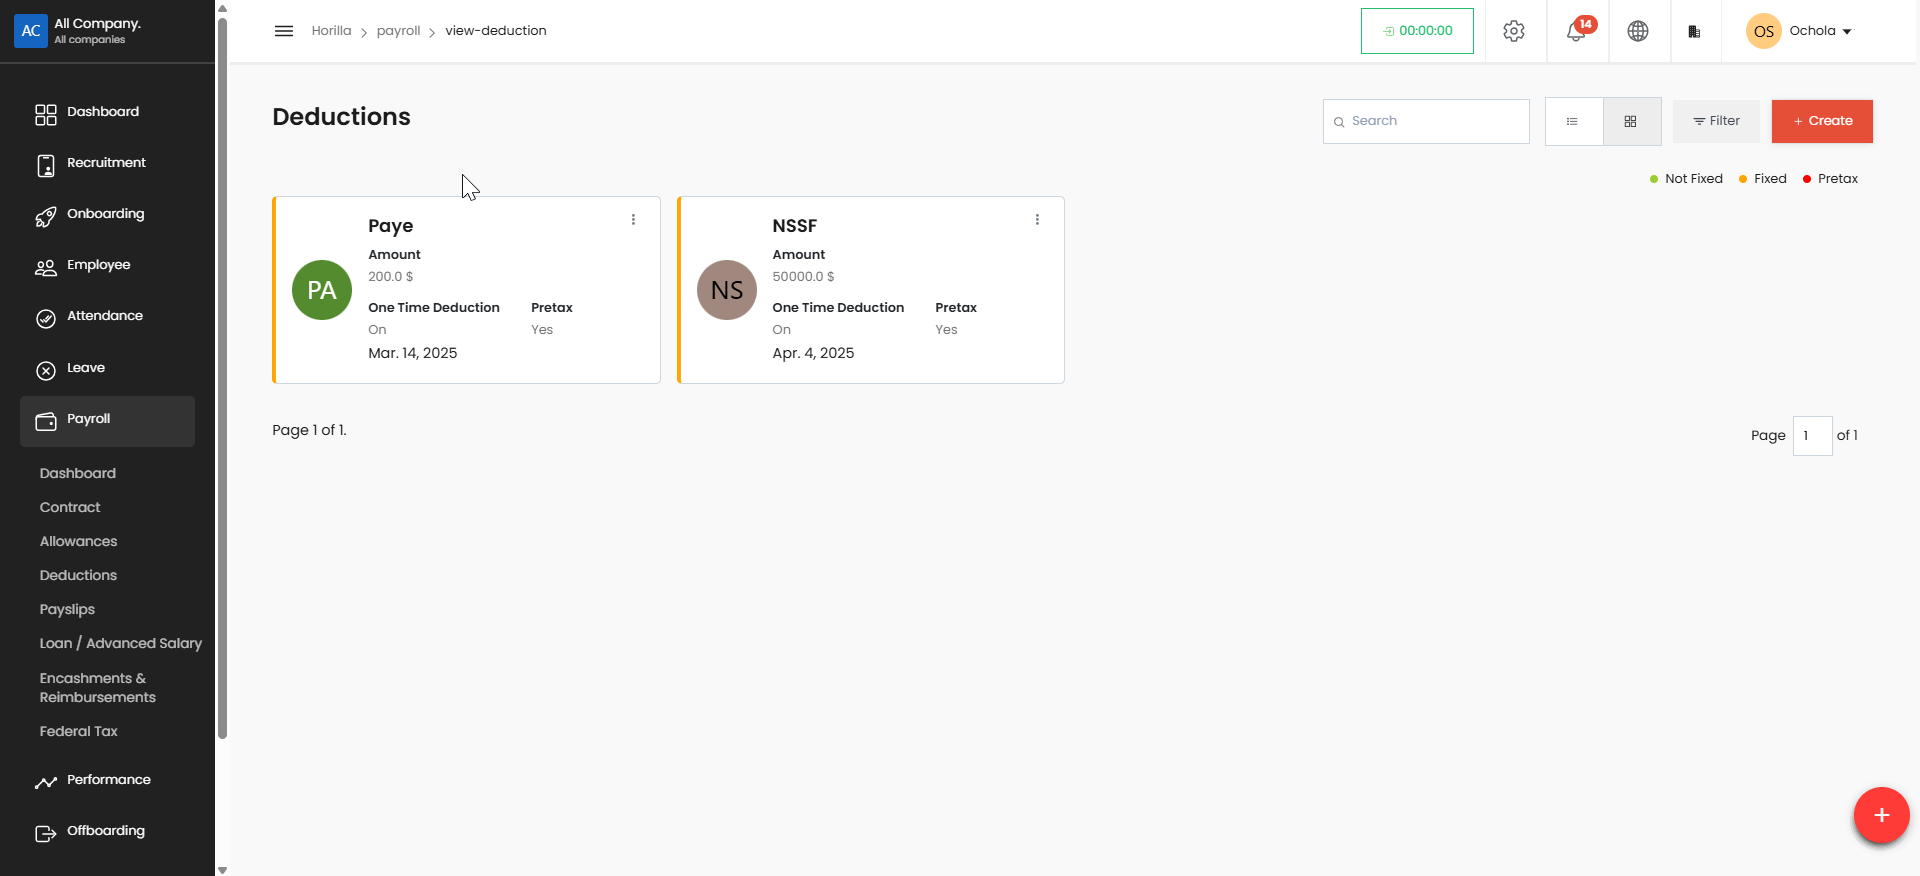
Deductions#
Manages employee deductions, including taxes, insurance premiums, and other withholdings.
From the left sidebar menu, click on Payroll.
Under the Payroll section, select Deductions.
The page will display all existing deductions.
Key Features and Functionalities#
Viewing Deductions#
Deductions are displayed in card format, showing:
Deduction Type (e.g., Paye)
Amount
One-time or recurring deduction status
Tax applicability (Pre-tax or Post-tax)
Deduction Date
Searching for Deductions#
Use the Search bar at the top-right corner to find a specific deduction.
Enter keywords such as deduction name or amount to filter results.
Filtering Deductions#
Click the Filter button (top-right).
You can filter deductions based on:
Fixed or Not Fixed
Pre-tax or Post-tax deductions
Creating a New Deduction#
Click the red + Create button at the top-right.
A form is displayed to fill in the details about the deduction:
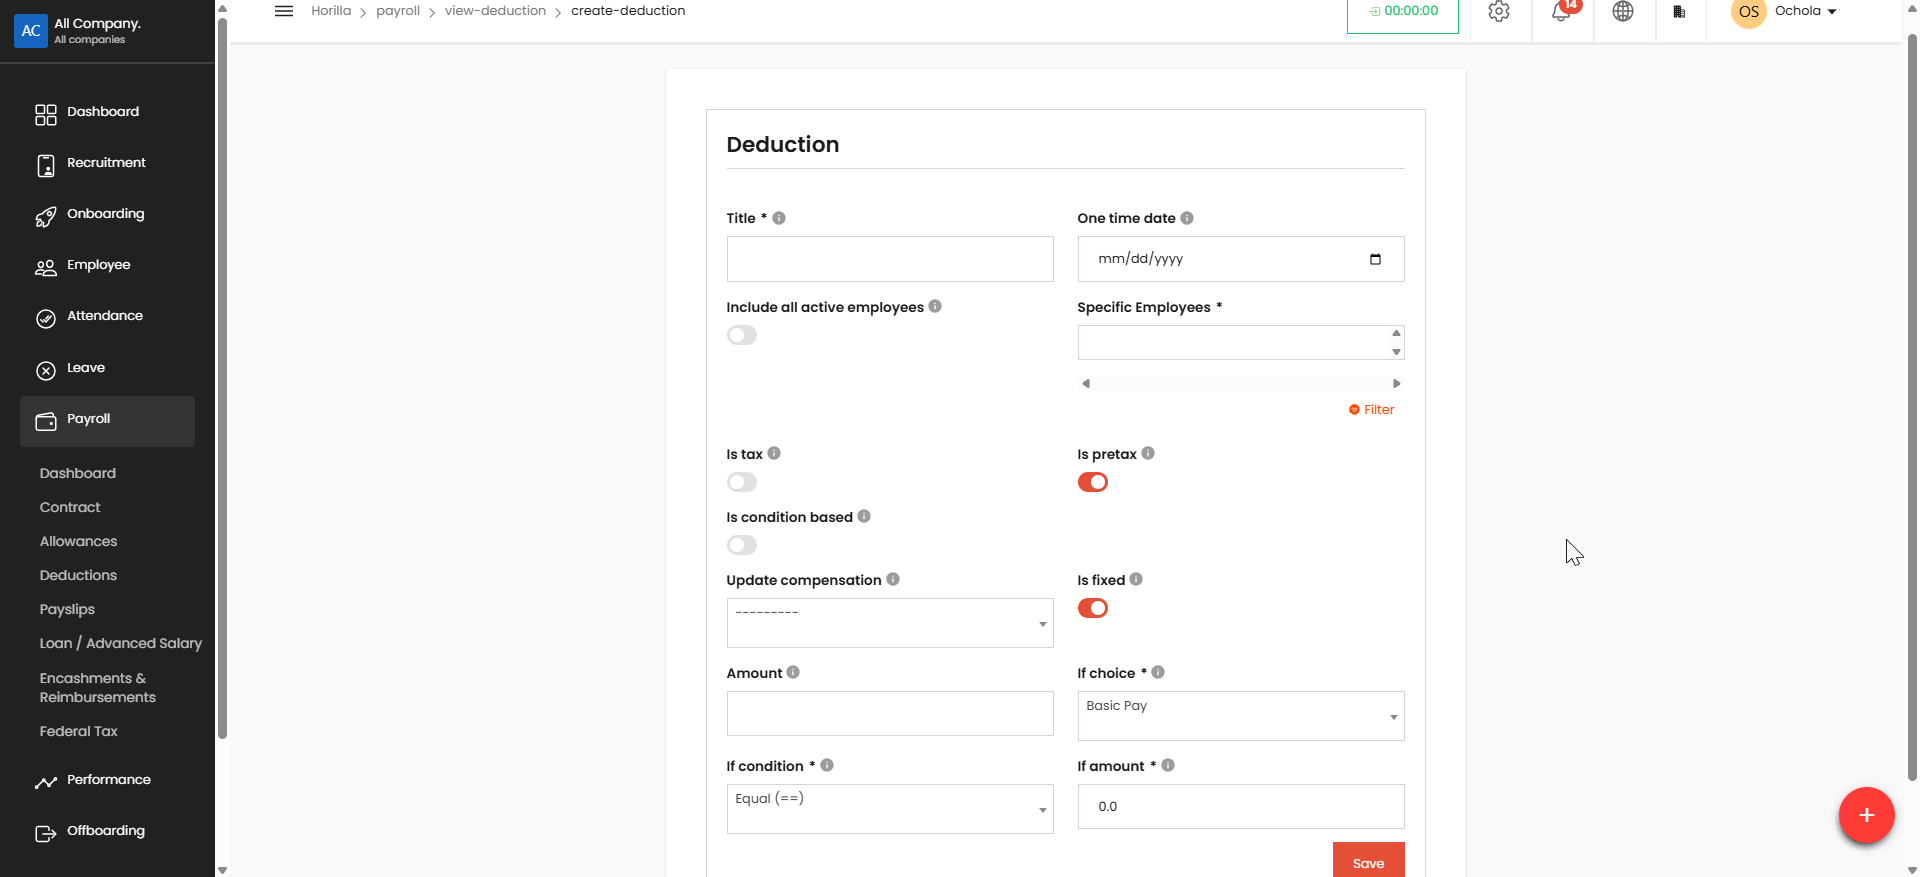
Deduction Name
Amount
Deduction Type (Fixed, One-Time, Pre-tax, etc.)
Effective Date
Click Save to apply the changes.
Managing Deductions#
Click the three-dot menu on a deduction card to access additional options such as Edit or Delete.
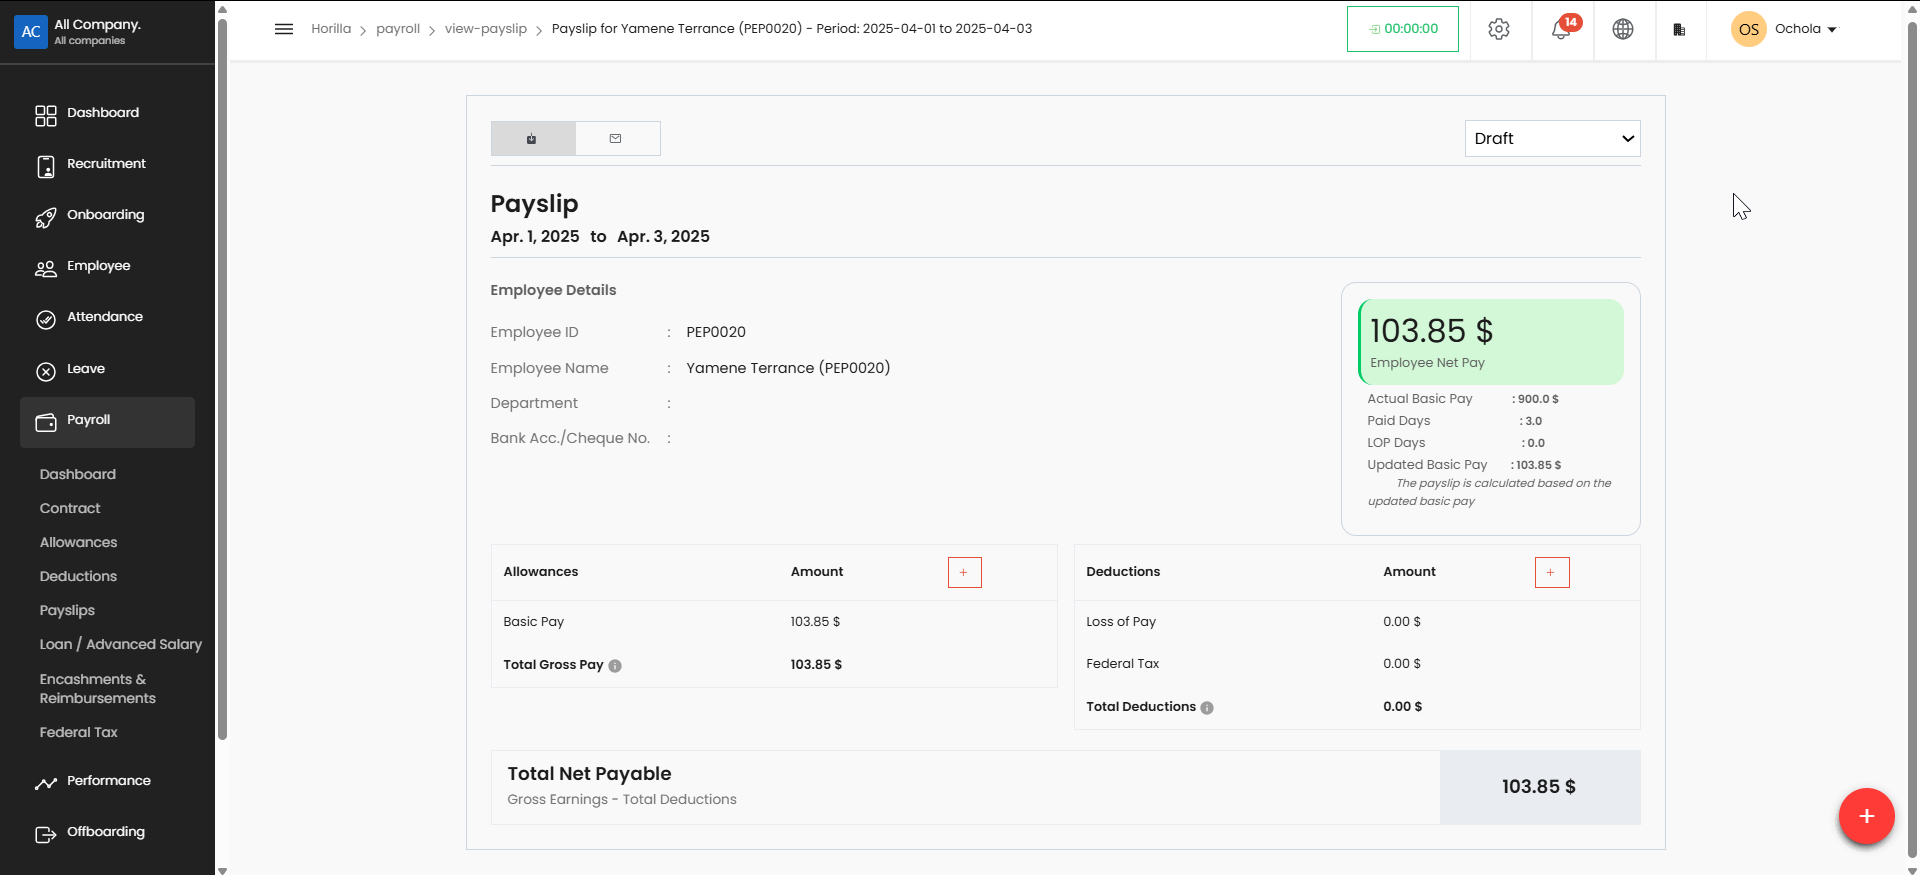
Payslips#
Allows for the generation and distribution of employee payslips, detailing earnings and deductions.
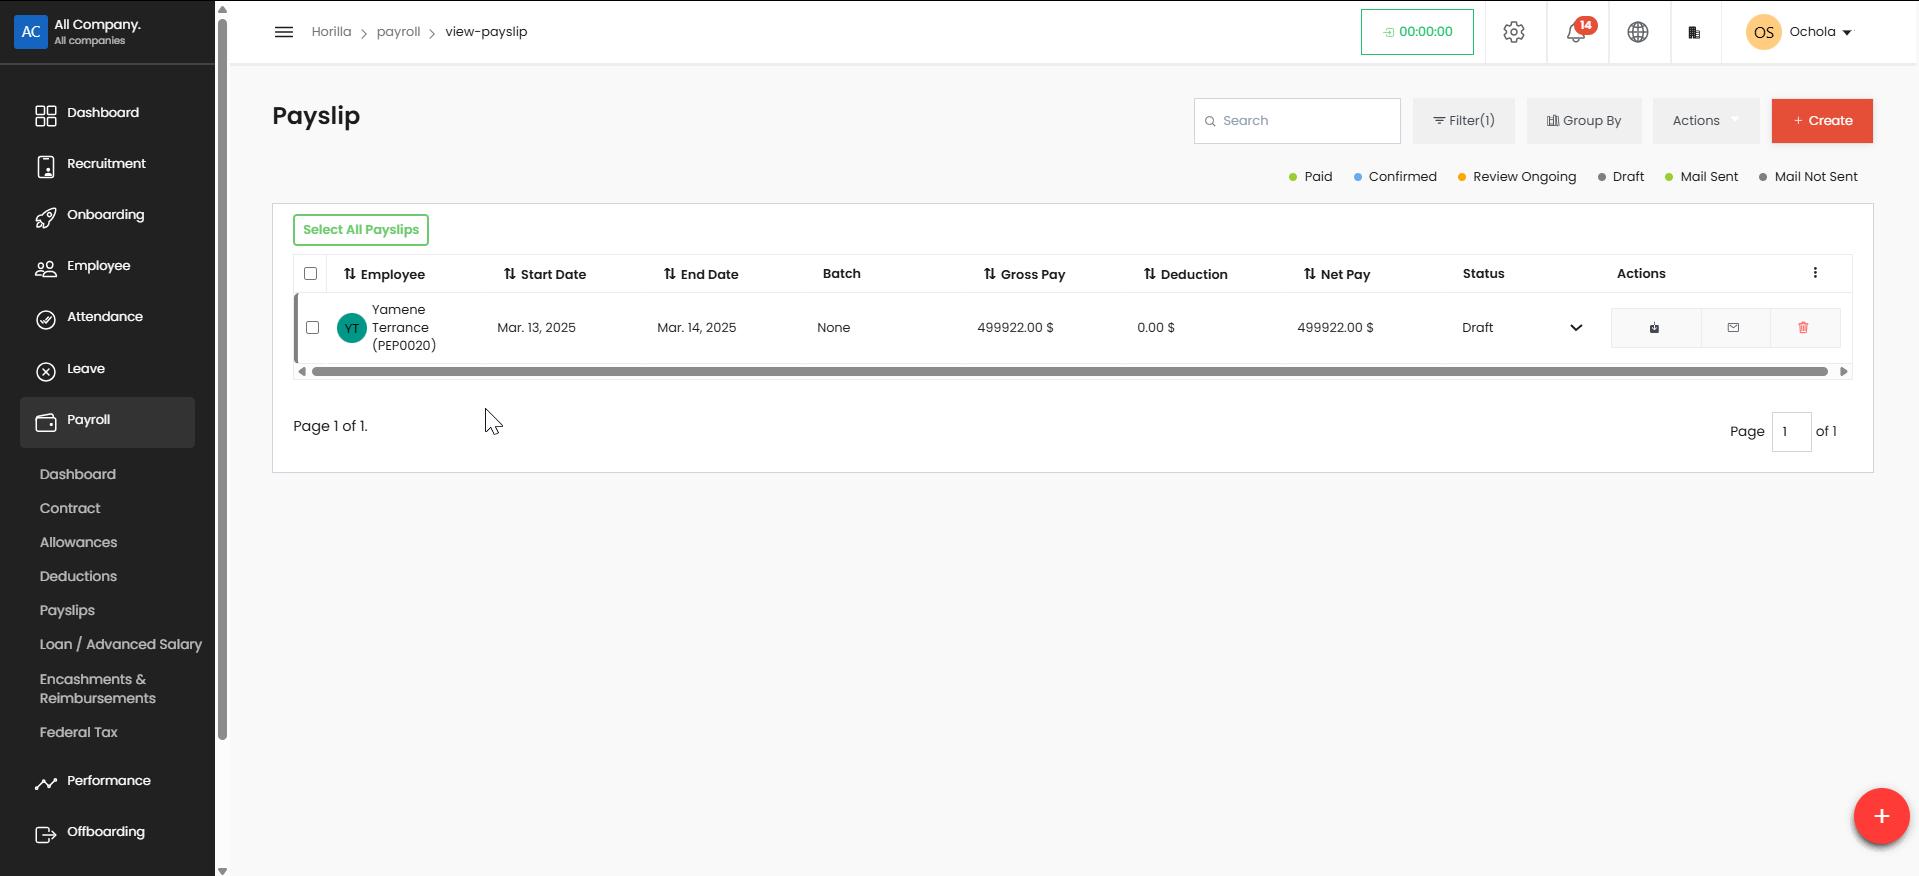
Accessing the Payslip Page#
Navigate to Payroll > Payslips from the left sidebar.
The page displays a list of payslips with employee names, start and end dates, gross pay, deductions, net pay, and status.
Creating a New Payslip#
Click the red + Create button.
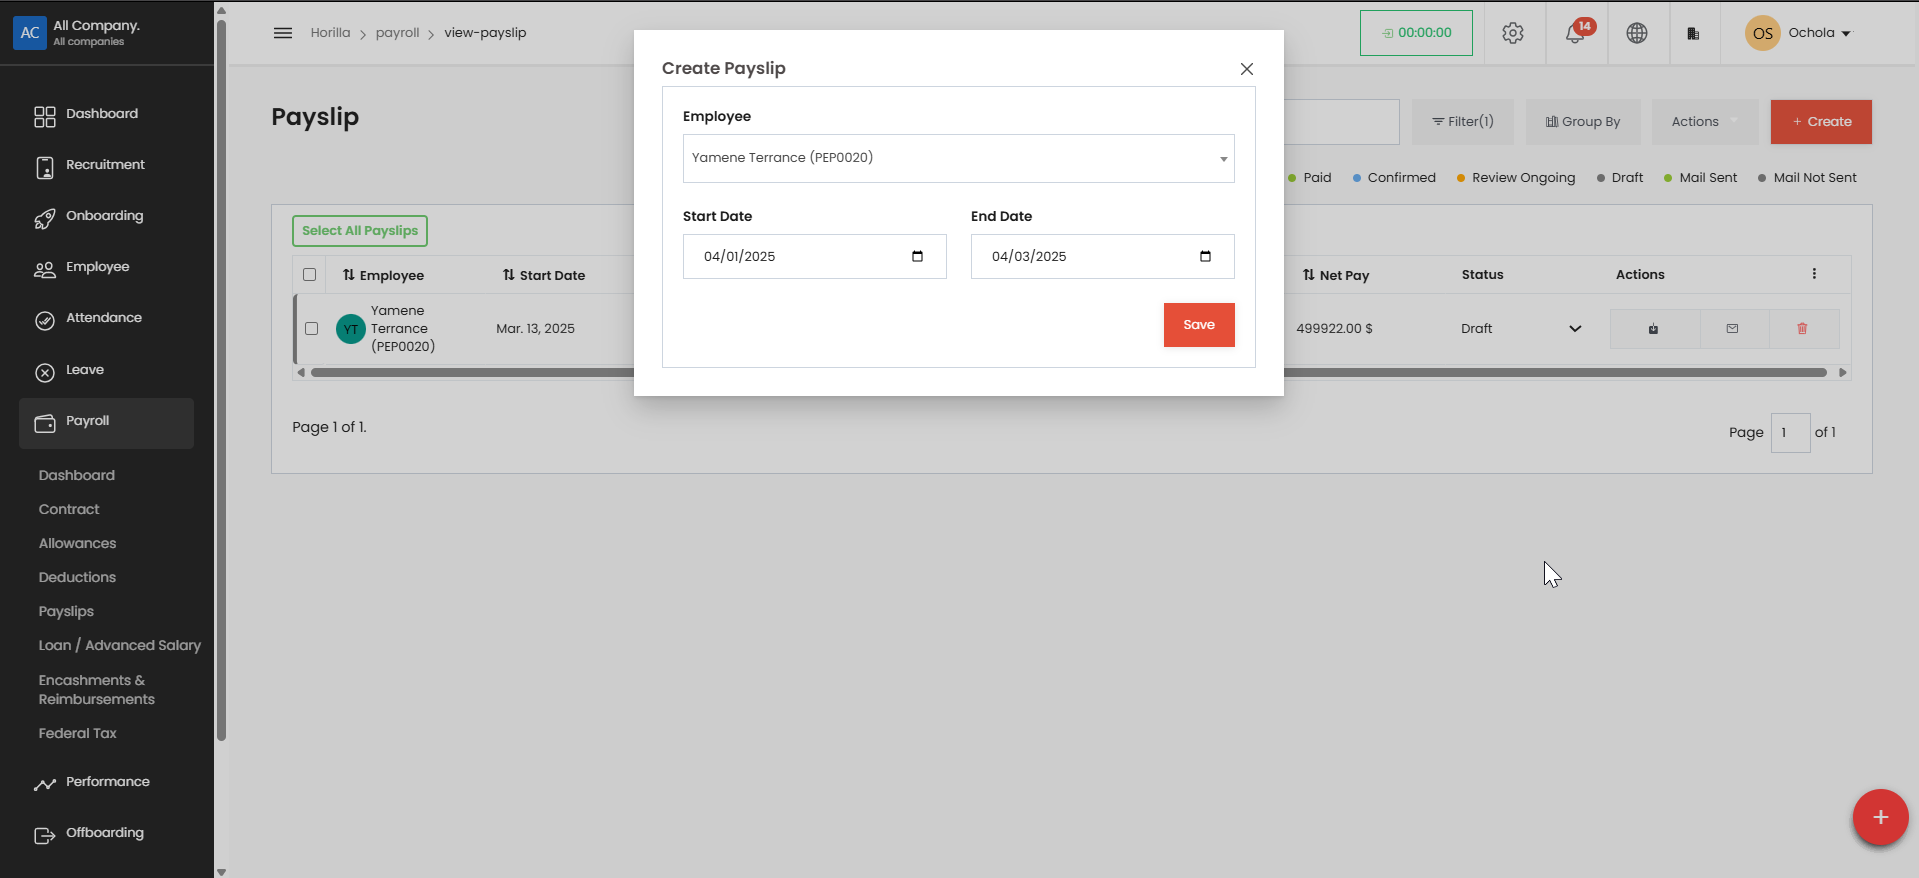
Enter necessary details, including employee name, and the corresponding dates
Save the payslip to finalize it.
Searching and Filtering#
Use the Search bar (top-right) to find specific payslips by employee name or other details.
Click Filter to refine results based on status (Paid, Confirmed, Draft, etc.).
Click Group By to organize payslips by batch, employee, or other criteria.
Managing Payslips#
Select Payslips using checkboxes for bulk actions.
You can as well;
Download the payslip or Send it via Email
Tracking Payslip Status#
The status of each payslip (Draft, Review Ongoing, Confirmed, etc.) is indicated by color-coded labels.
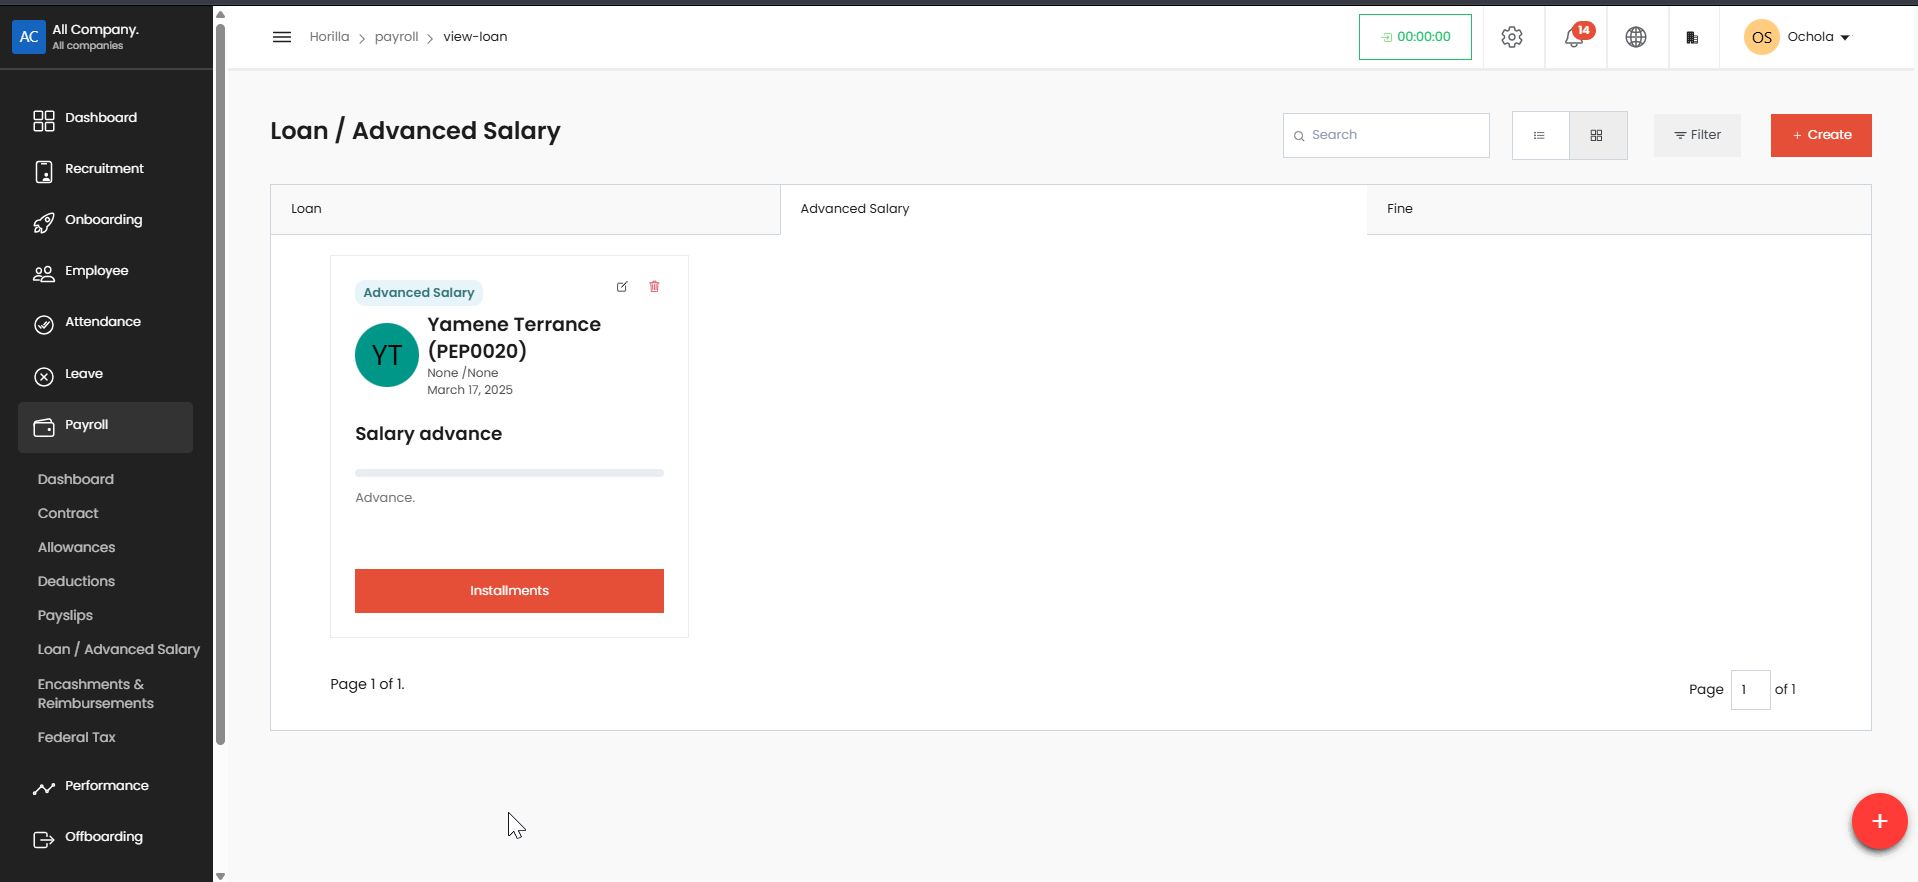
Loan / Advanced Salary#
The Loan/Advanced Salary feature allows you to process salary advances or loans for employees, set up installment plans, and track repayments.
Accessing the Loan/Advanced Salary Section#
Navigate to the main dashboard using the sidebar menu Click on Payroll in the left sidebar menu Select Loan / Advanced Salary from the dropdown menu
Creating a New Loan or Salary Advance#
On the Loan/Advanced Salary page, click the + Create button in the top-right corner
A popup form will appear with required fields to complete
Completing the Form#
Fill in the following information:
Type: Select "Loan" from the dropdown menu
Title: Enter a descriptive title for the loan/advance
Employee: Select the employee from the dropdown
Amount: Enter the total amount to be advanced
Provided date: Enter the date when the loan/advance will be provided (defaults to current date)
Description: Add any relevant details about the purpose or terms of the loan/advance
Installment Amount: Enter the amount to be deducted per installment
Total Installments: Specify the number of installments for repayment
Installment start date: Select when the repayments should begin
Settled: Toggle on if the loan has already been settled (leave off for new loans)
Review all entered information for accuracy
Click the Save button at the bottom of the form

Viewing and Managing Loans/Advances#
All created loans and advances appear in the main view
Each entry shows the employee name, ID, date, and advance details
You can view installment details by clicking the Installments button on any entry
Accessing Loan/Advanced Salary Details#
When you click on the Installments button for an employee's loan or advance record, a "Details" popup window appears, showing comprehensive information about the arrangement:
Review the details popup showing:
Total, paid, and balance amounts
Installment schedule with dates and amounts
Close with X when finished
The system tracks all repayments automatically and maintains the balance until the loan is fully settled.
Use the edit (pencil) and delete (trash) icons to modify or remove entries as needed
NB: The system distinguishes between Loans, Advanced Salary, and Fine categories which can be selected via tabs
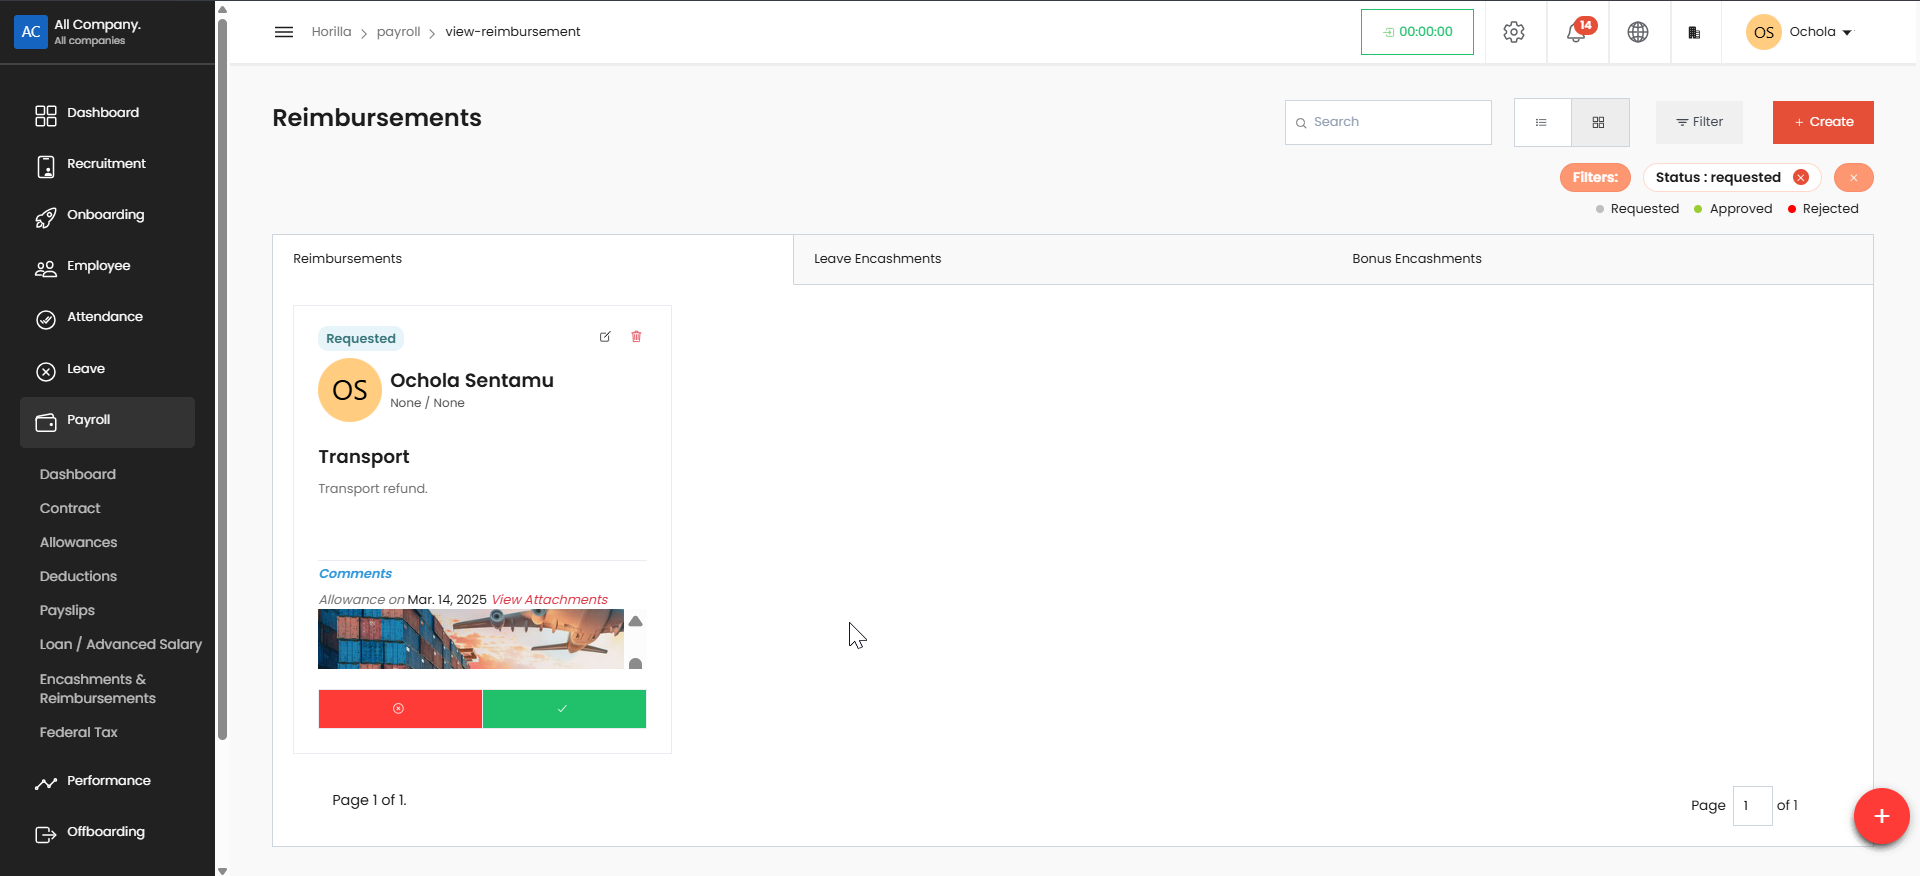
Encashments & Reimbursements#
Handles employee expense reimbursements and encashment requests.
Access the Reimbursement Page
Navigate to Payroll → Encashment/Reimbursement from the left sidebar menu
You'll see the main dashboard
Initiate a New Request#
Click the "+ Create" button in the top right corner of the screen
A popup form titled Reimbursement / Encashment will appear
Fill in the Required Information#
Title: Enter a title for your reimbursement (required field)
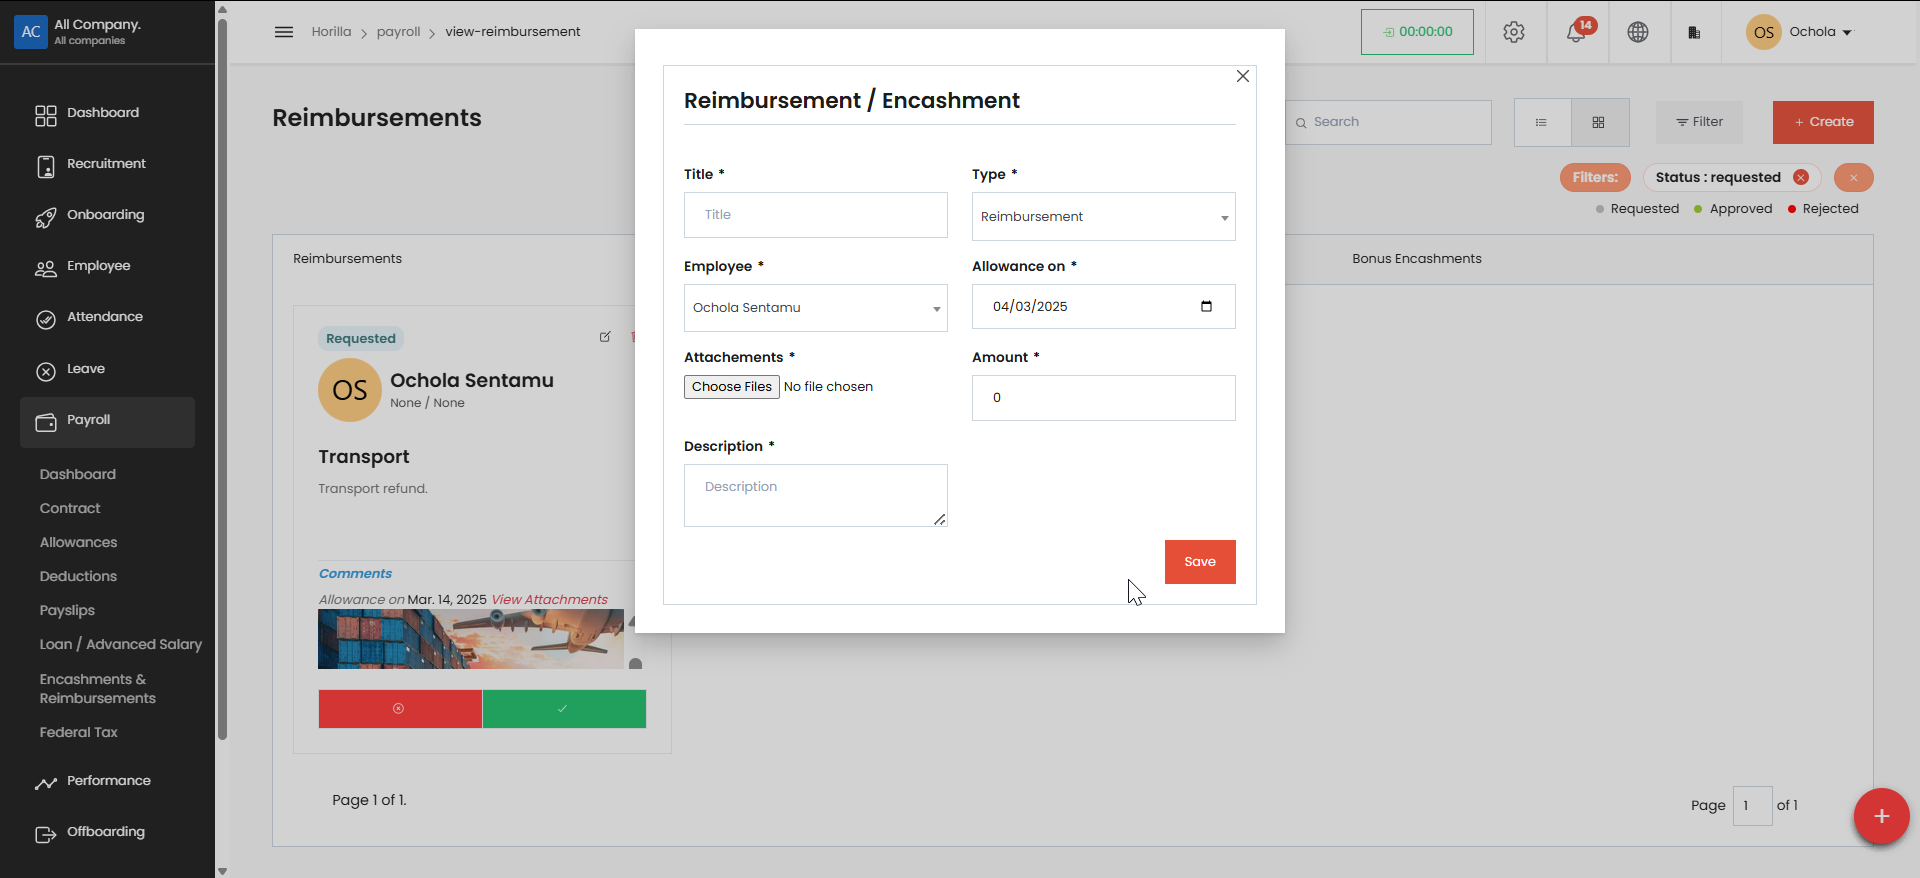
Type: Select "Reimbursement" from the dropdown (required field)
Employee: Select the employee name (Ochola Sentamu is shown in the example)
Allowance on: Select the date using the calendar picker (current date is 04/03/2025)
Attachments: Click "Choose Files" to upload supporting documents
Amount: Enter the reimbursement amount
Description: Provide details about the reimbursement request (e.g., "Transport refund")
Submit the Request#
Click the "Save" button at the bottom of the form
Your request will be submitted with "Requested" status
View or Manage Existing Requests#
All requests appear on the main Reimbursements page
You can filter by status (Requested, Approved, Rejected) using the filters
Toggle between different tabs ("Reimbursements", "Leave Encashments", "Bonus Encashments")
Use the red/green buttons at the bottom of each request to reject or approve (if you have permission)
Federal Tax#
Manages federal tax calculations and reporting.