Recruitment Module Documentation#
Overview#
The Recruitment module in the Horilla HR System provides a structured approach to managing the hiring process. It consists of several key sections that help streamline candidate selection, interviews, and job postings.
Sections#
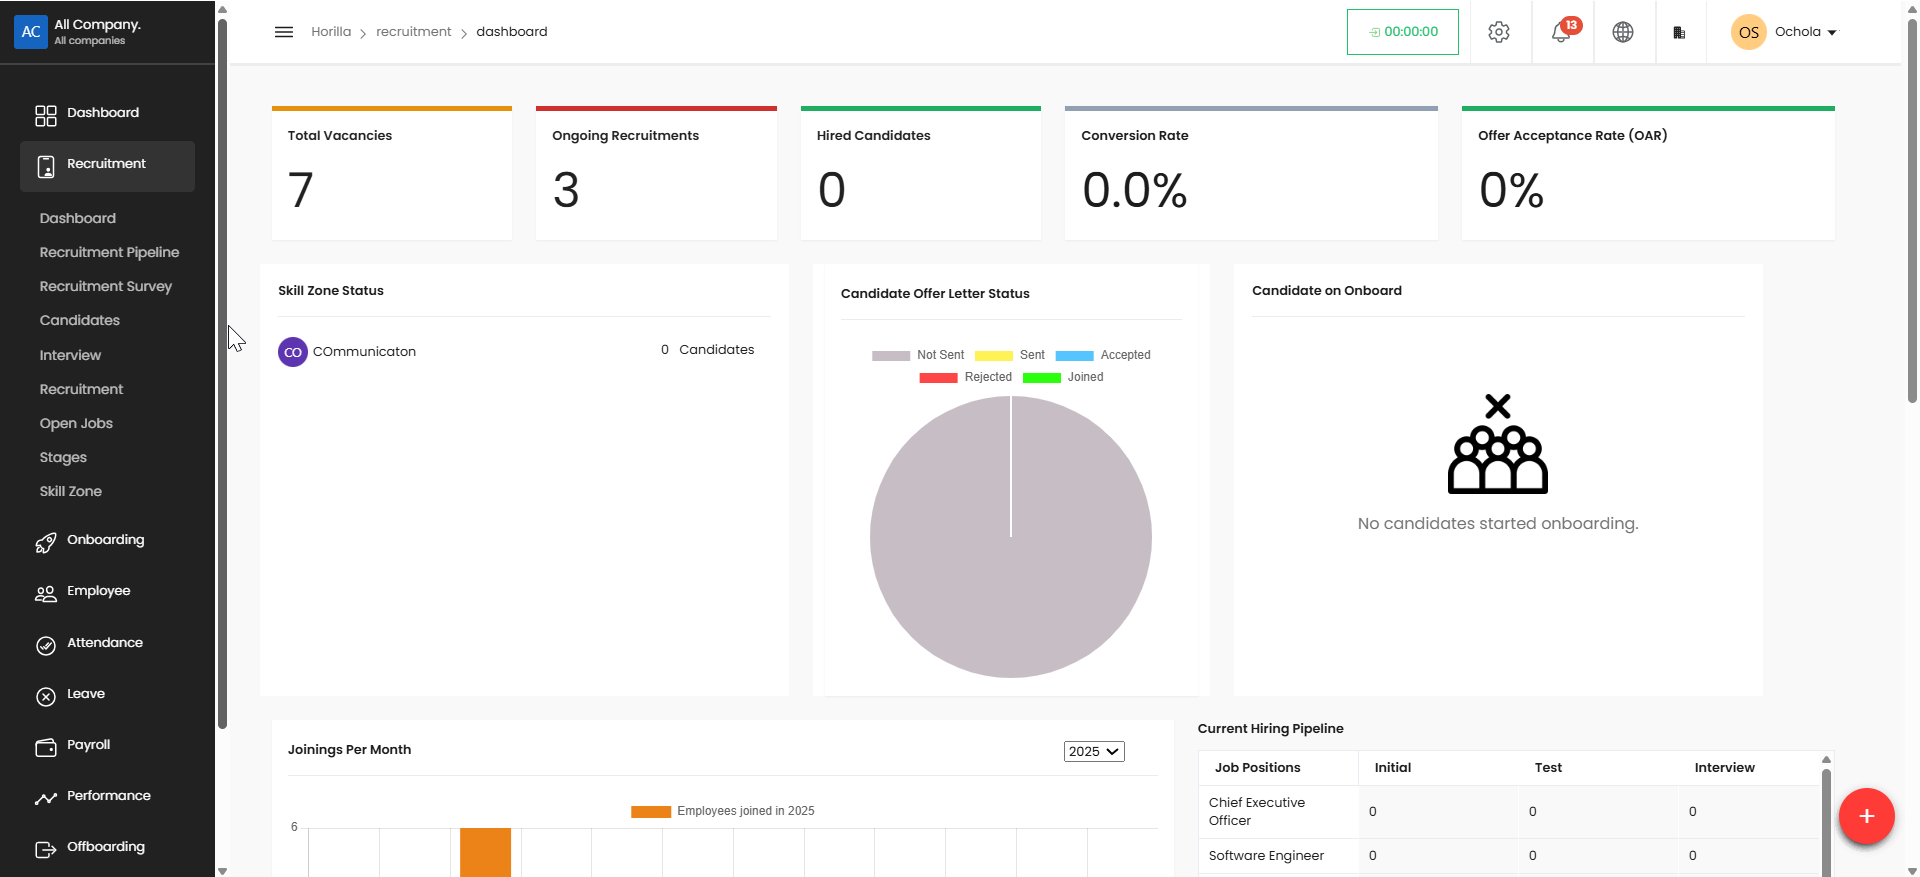
1. Dashboard#
The dashboard provides an overview of the recruitment process, including key metrics, recent activities, and quick access to essential features.
2. Recruitment Pipeline#
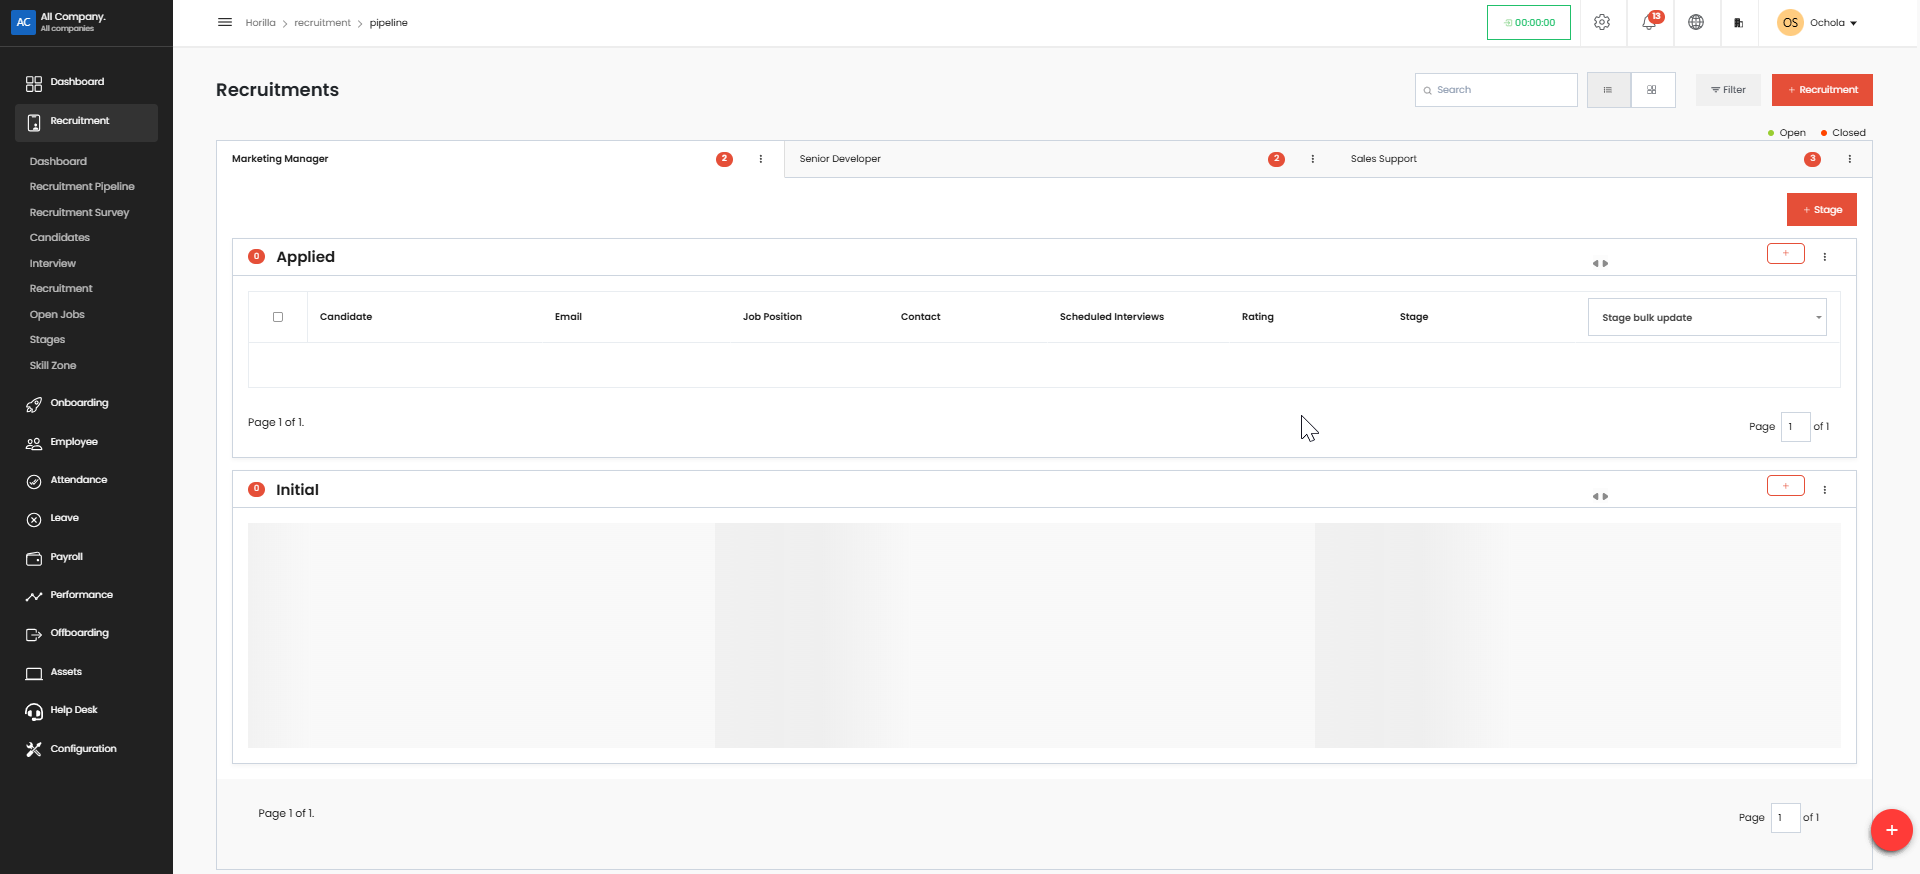
This section displays the progress of candidates through different stages of the recruitment process. It provides a visual representation of where each candidate is in the hiring funnel.
Accessing the Recruitment Pipeline#
Navigate to the Recruitment module from the left sidebar.
Click on Recruitment Pipeline to access the pipeline view.
How to Add a Recruitment in Horilla HR System#
Click on Recruitment in the sidebar and then + Recruitment icon in the upper right corner.
Fill in the details – Title, Description, Job Position, Managers, Start & End Dates, Vacancy, and Company.
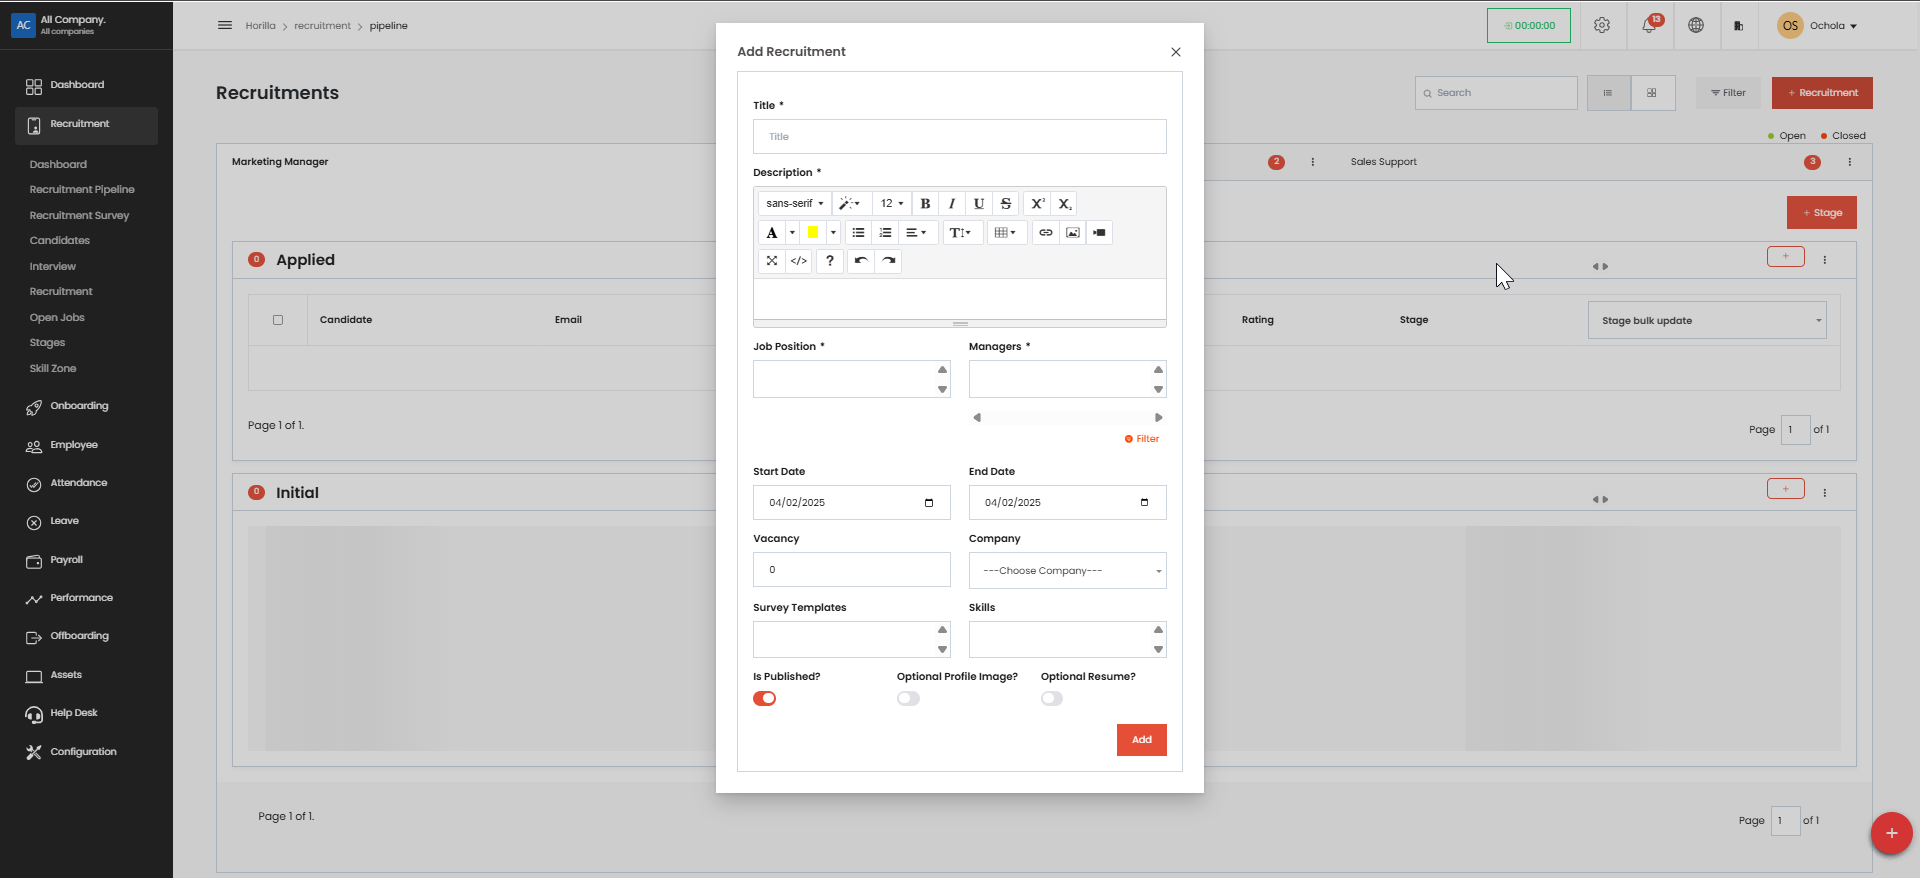
Set preferences – Choose Survey Templates, Skills, and toggle options for publishing, profile image, and resume.
Click Add to save the recruitment.
Understanding the Pipeline Interface#
At the top, you will see the list of job positions (e.g., "Marketing Manager", "Senior Developer", "Sales Support").
Each job position has a number indicator showing the number of candidates in that stage.
Below the job titles, candidates are categorized into different stages of the recruitment process.
Viewing Candidates in Different Stages#
Each section under a job title represents a stage in the recruitment process (e.g., Applied, Initial, Screening, Interview).
The number next to the stage name (e.g., Applied (0)) shows how many candidates are currently in that stage.
Candidate information is displayed in a table with columns such as:
Candidate Name, Email, Job Position, Contact, Scheduled Interviews, Rating, Current Stage
Managing Candidates in the Pipeline#
Use the Stage Bulk Update dropdown to move multiple candidates to a different stage at once.
Click the + Stage button to add a new stage to the recruitment process.
Click the + button next to each stage to manually add candidates or take action on existing candidates.
Filtering and Searching Candidates#
Use the Search bar at the top right to find specific candidates.
Click the Filter button to apply filters based on job position, status, or other criteria.
Move candidates forward in the pipeline by changing their stage using the Stage Bulk Update option.
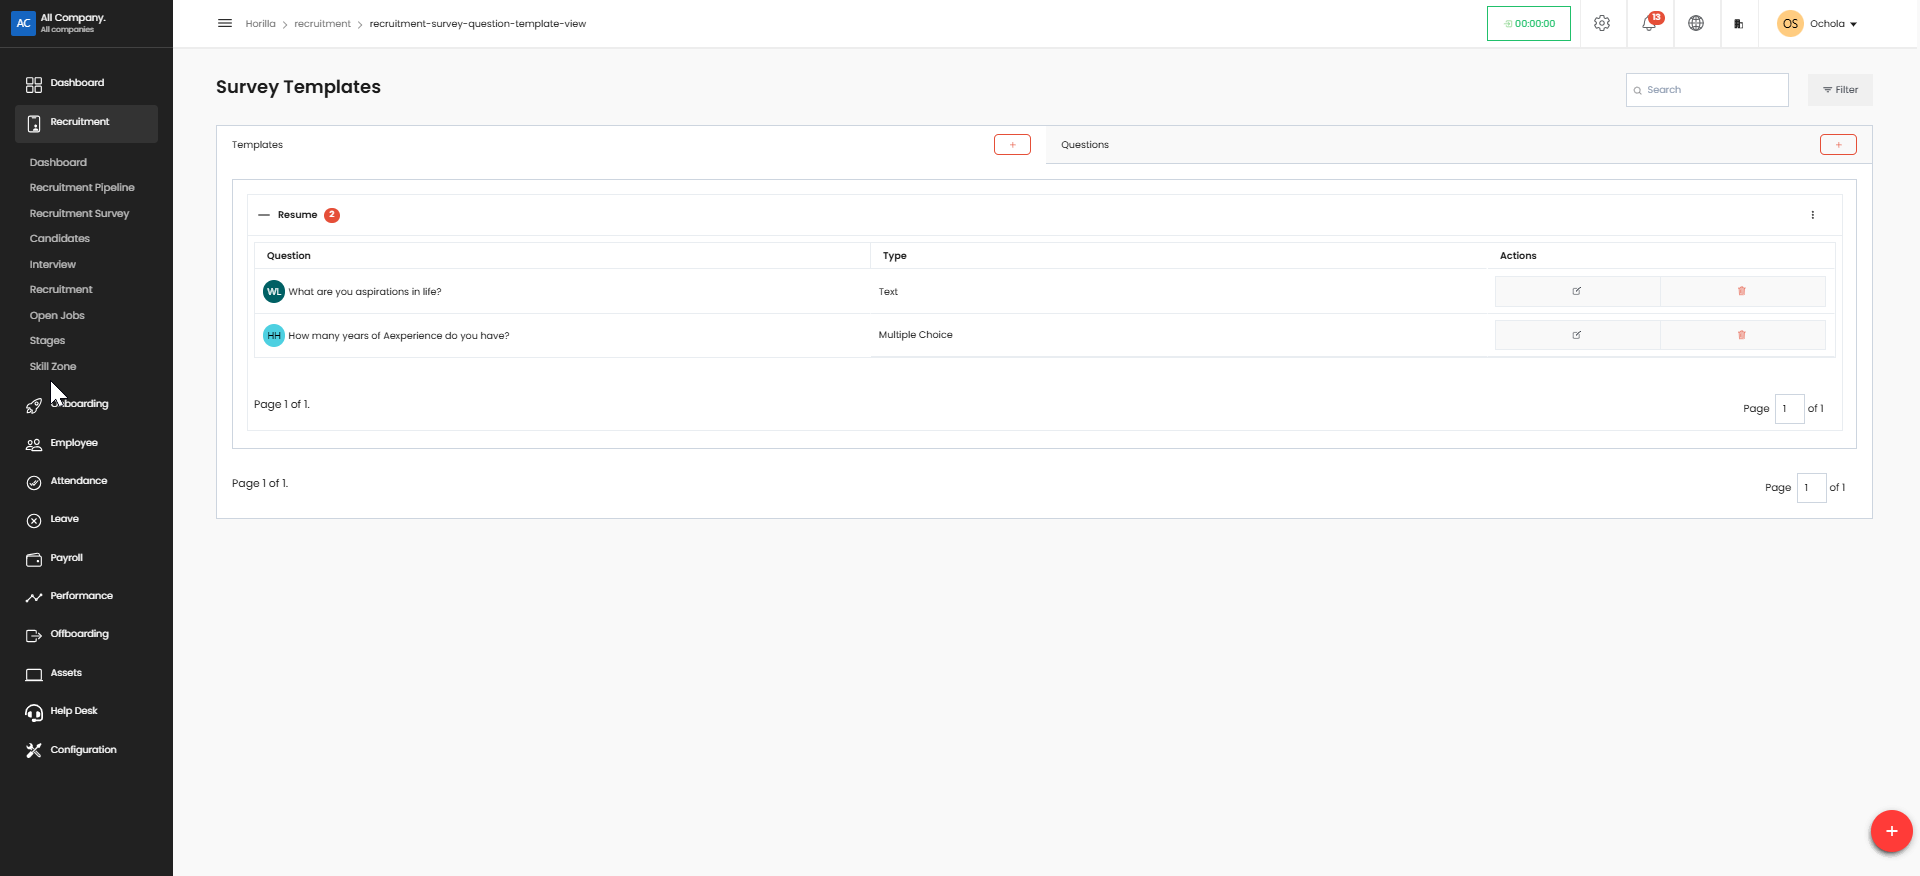
3. Recruitment Survey#
This module allows recruiters to create and manage surveys to gather insights from candidates, hiring managers, or employees regarding the recruitment process.
From the left sidebar menu, click on Recruitment
In the expanded recruitment submenu, click on Recruitment Survey
This will take you to the Survey Templates page where you can view existing survey templates
Creating a New Recruitment Survey#
On the Survey Templates page, locate the + button next to the Templates section
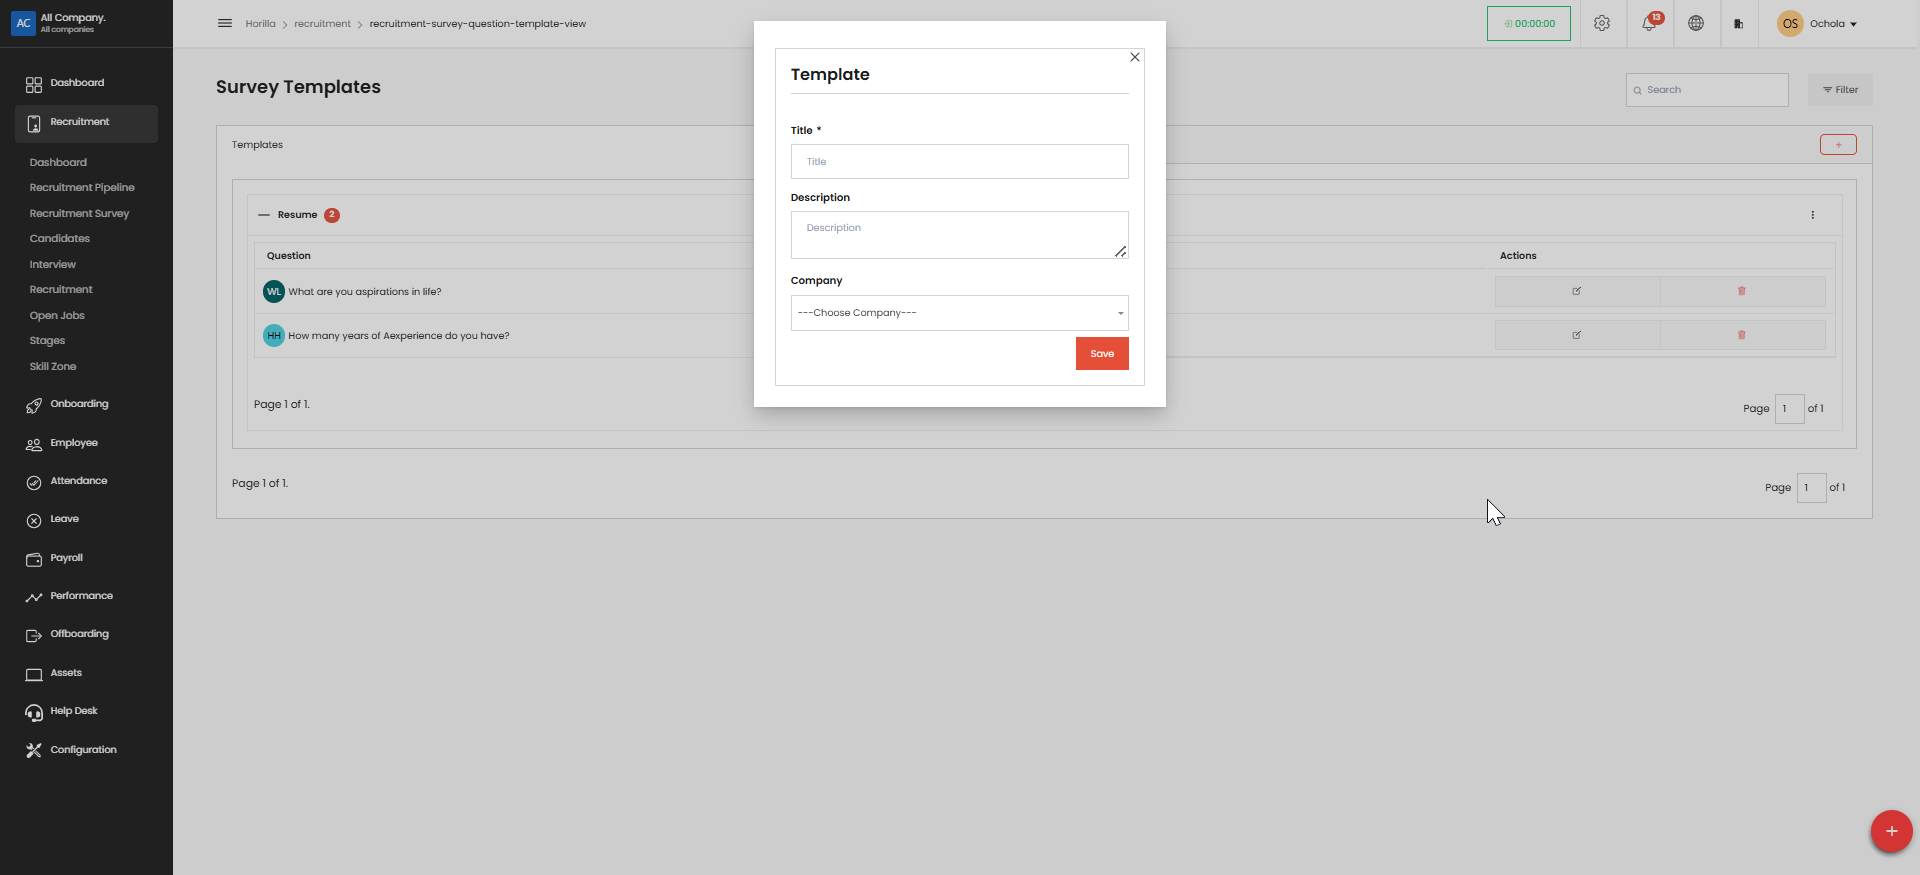
Click the + button to create a new survey template
Give your survey template a name (like Resume as shown in the example)
Add questions to your survey by clicking the + button next to "Questions"
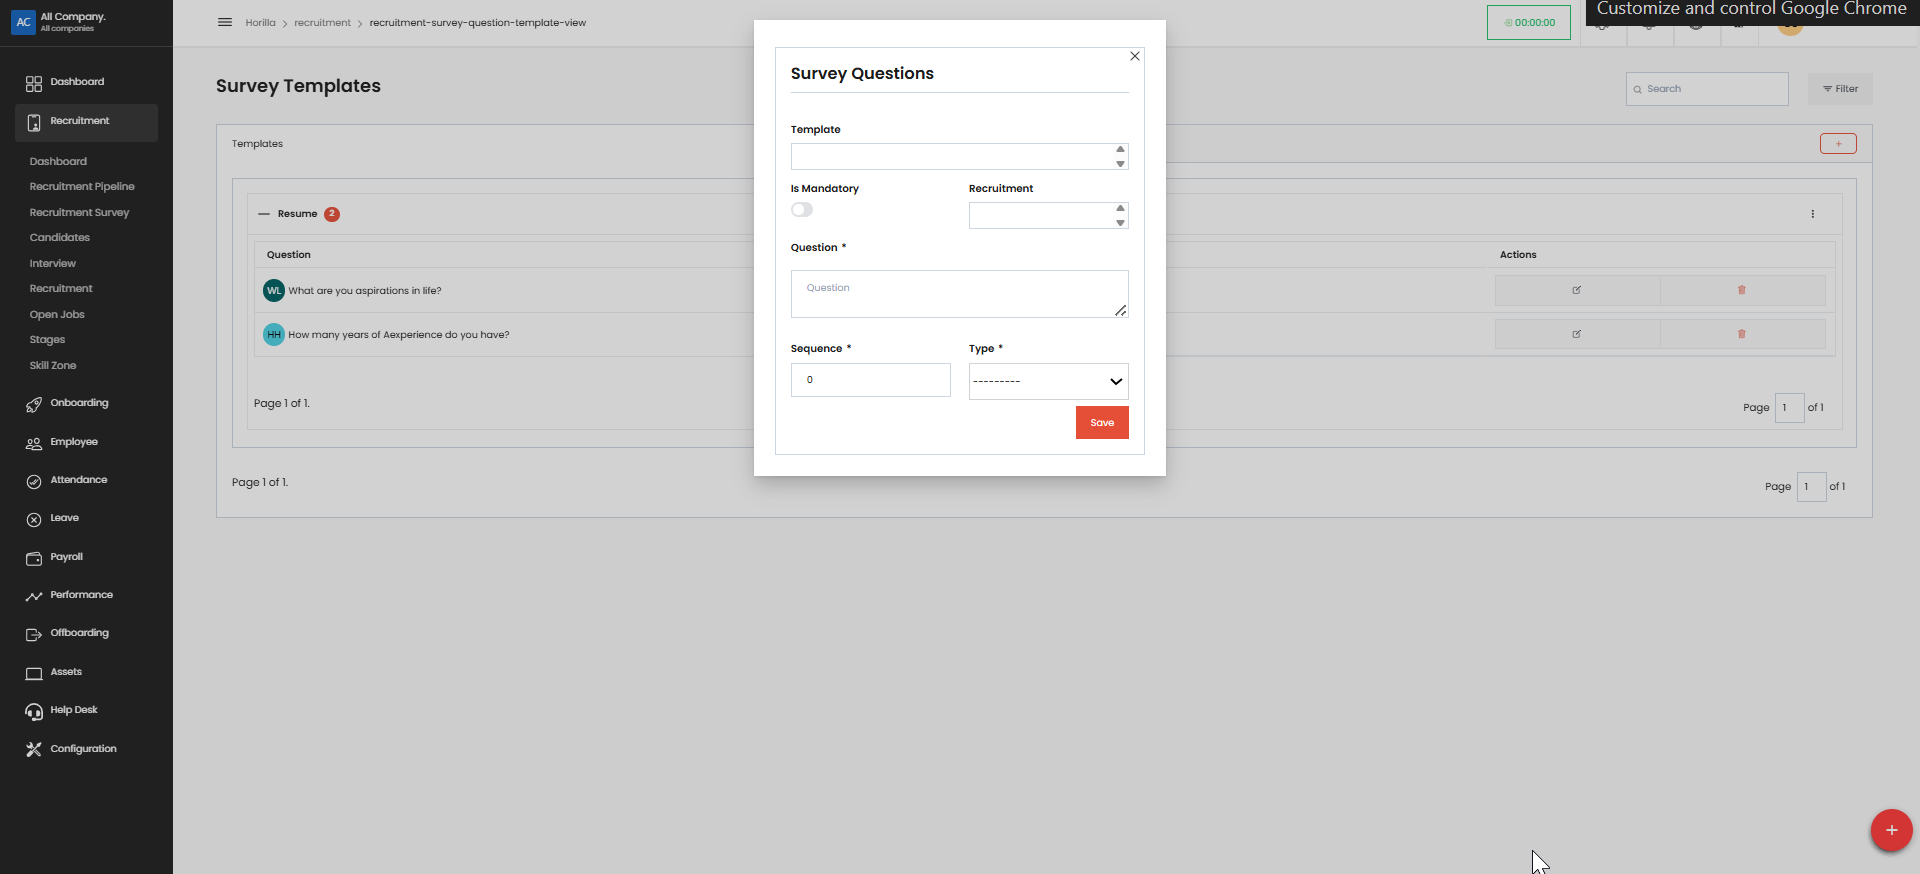
For each question:#
Type your question in the designated field
Select the question type (Text, Multiple Choice, etc.) from the dropdown
Use the Actions column tools to edit or customize your questions
Managing Survey Questions#
You can add different types of questions:
Text questions (like "What are your aspirations in life?"), Multiple Choice questions (like "How many years of experience do you have?")
Use the edit icon in the Actions column to modify existing questions
Use the additional icon (shown as a colored dot) to access more options for each question
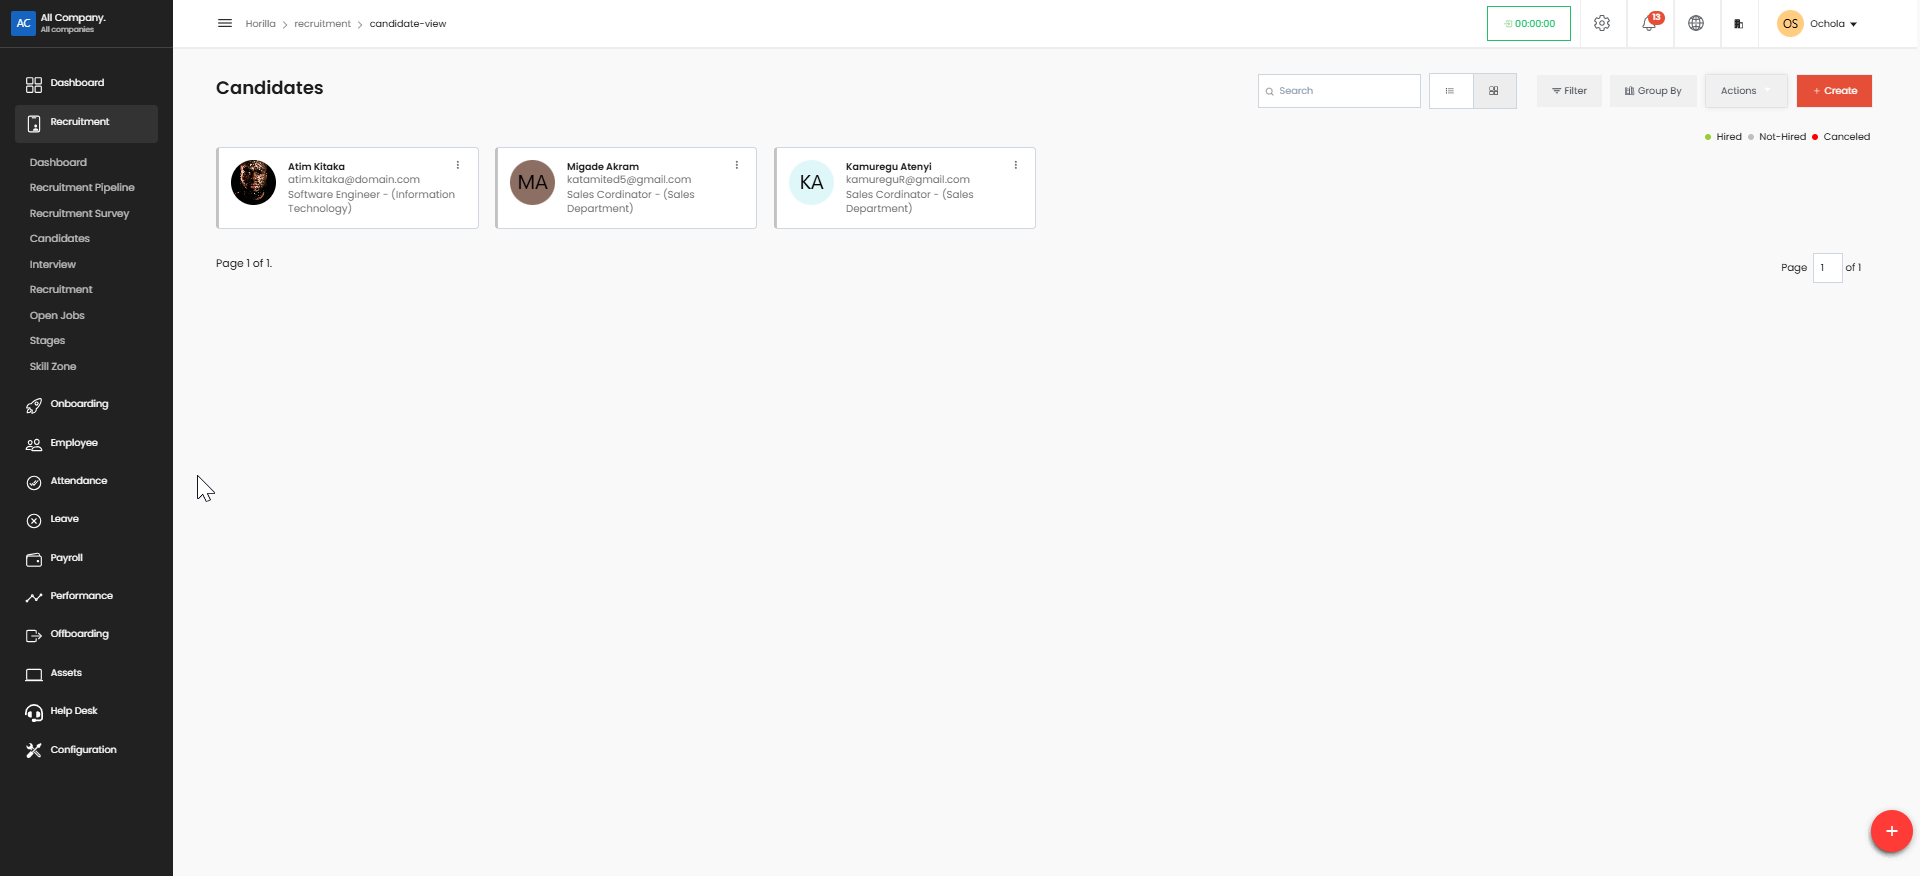
4. Candidates#
The Candidates section lists all applicants who have applied for job openings. It includes details such as resumes, application status, and communication history.
At this point, you're viewing the Candidates section where all job applicants are listed. Each candidate card shows their name, email, position, and department.
To create a new candidate:#
Click the red Create button in the top-right corner
Fill in the candidate's information in the form that appears
Add their contact details, resume, and position they're applying for

Select the appropriate department
Set their initial status (the system allows tracking as Hired, Not-hired, or Cancelled)
Save the new candidate record
Once created, the new candidate will appear in this list where you can track their application progress through the recruitment pipeline.
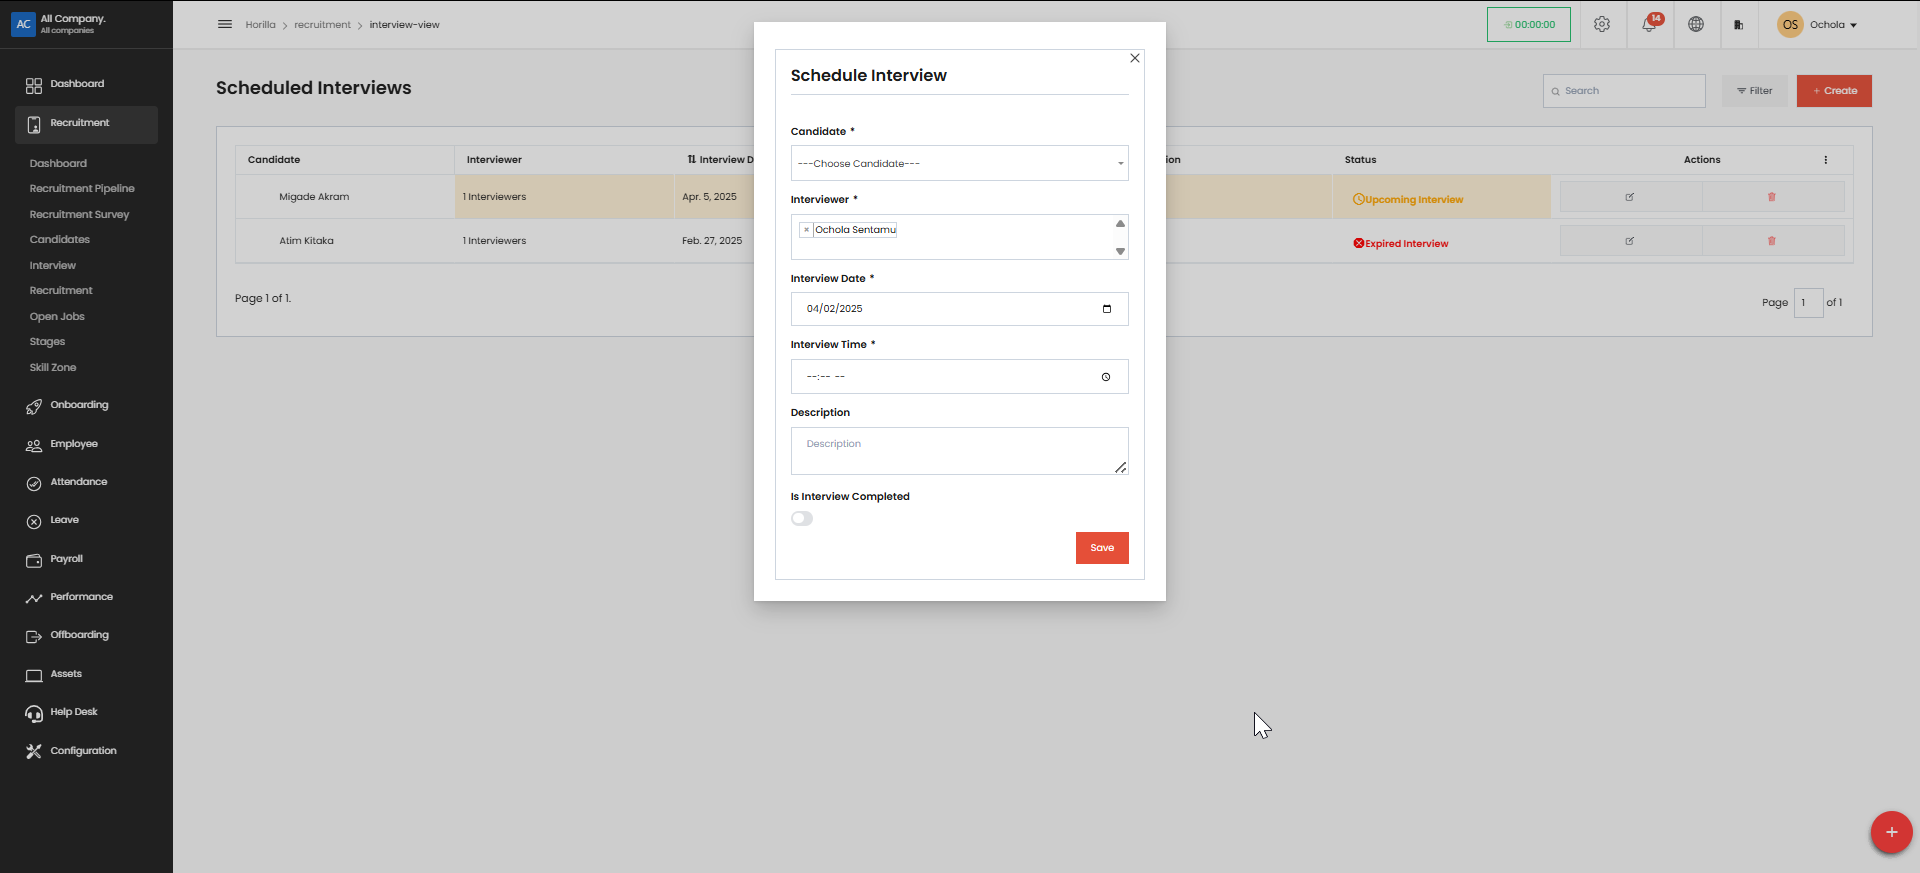
5. Interview#
The Interview module enables recruiters to schedule, manage, and evaluate candidate interviews. It may include interview templates, feedback forms, and scoring systems.
This screen displays all upcoming and past candidate interviews. Users can:
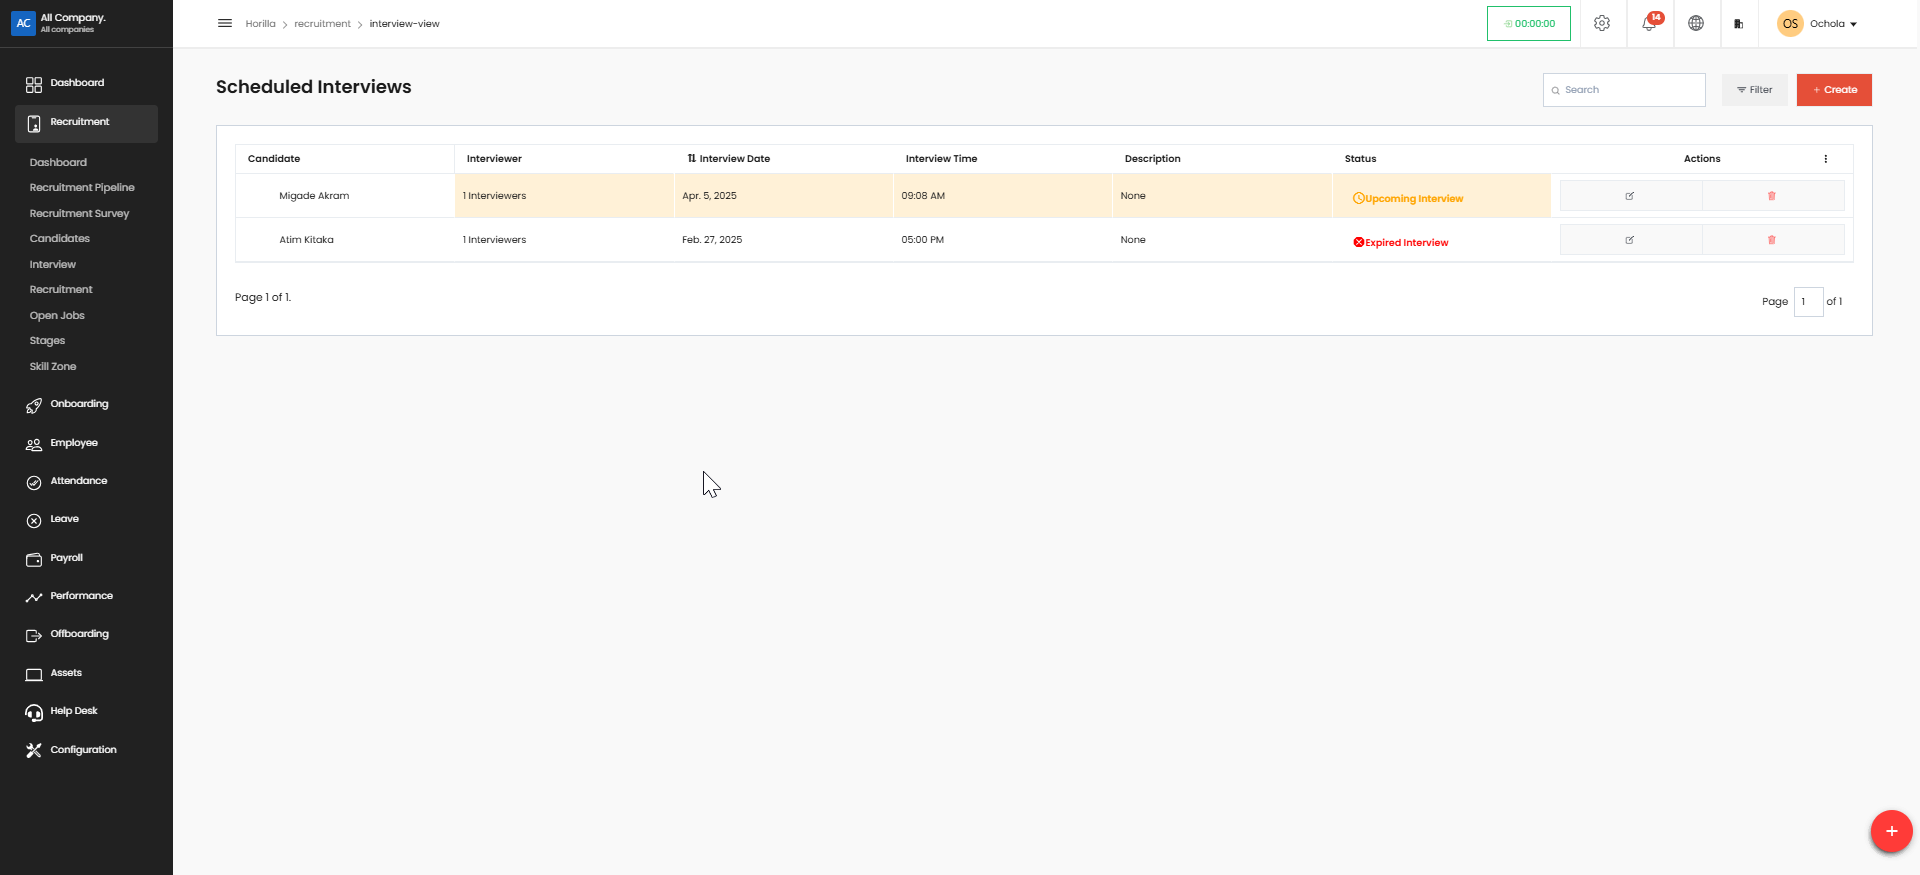
View interview details (candidate name, interviewer, date, time)
See interview status (upcoming in yellow, expired in red)
Create new interviews via the red Create button
FIll in the required fields and then click the Save button
Edit or manage interviews using the action icons
Search for specific interviews using the search box
Filter interviews with the filter dropdown
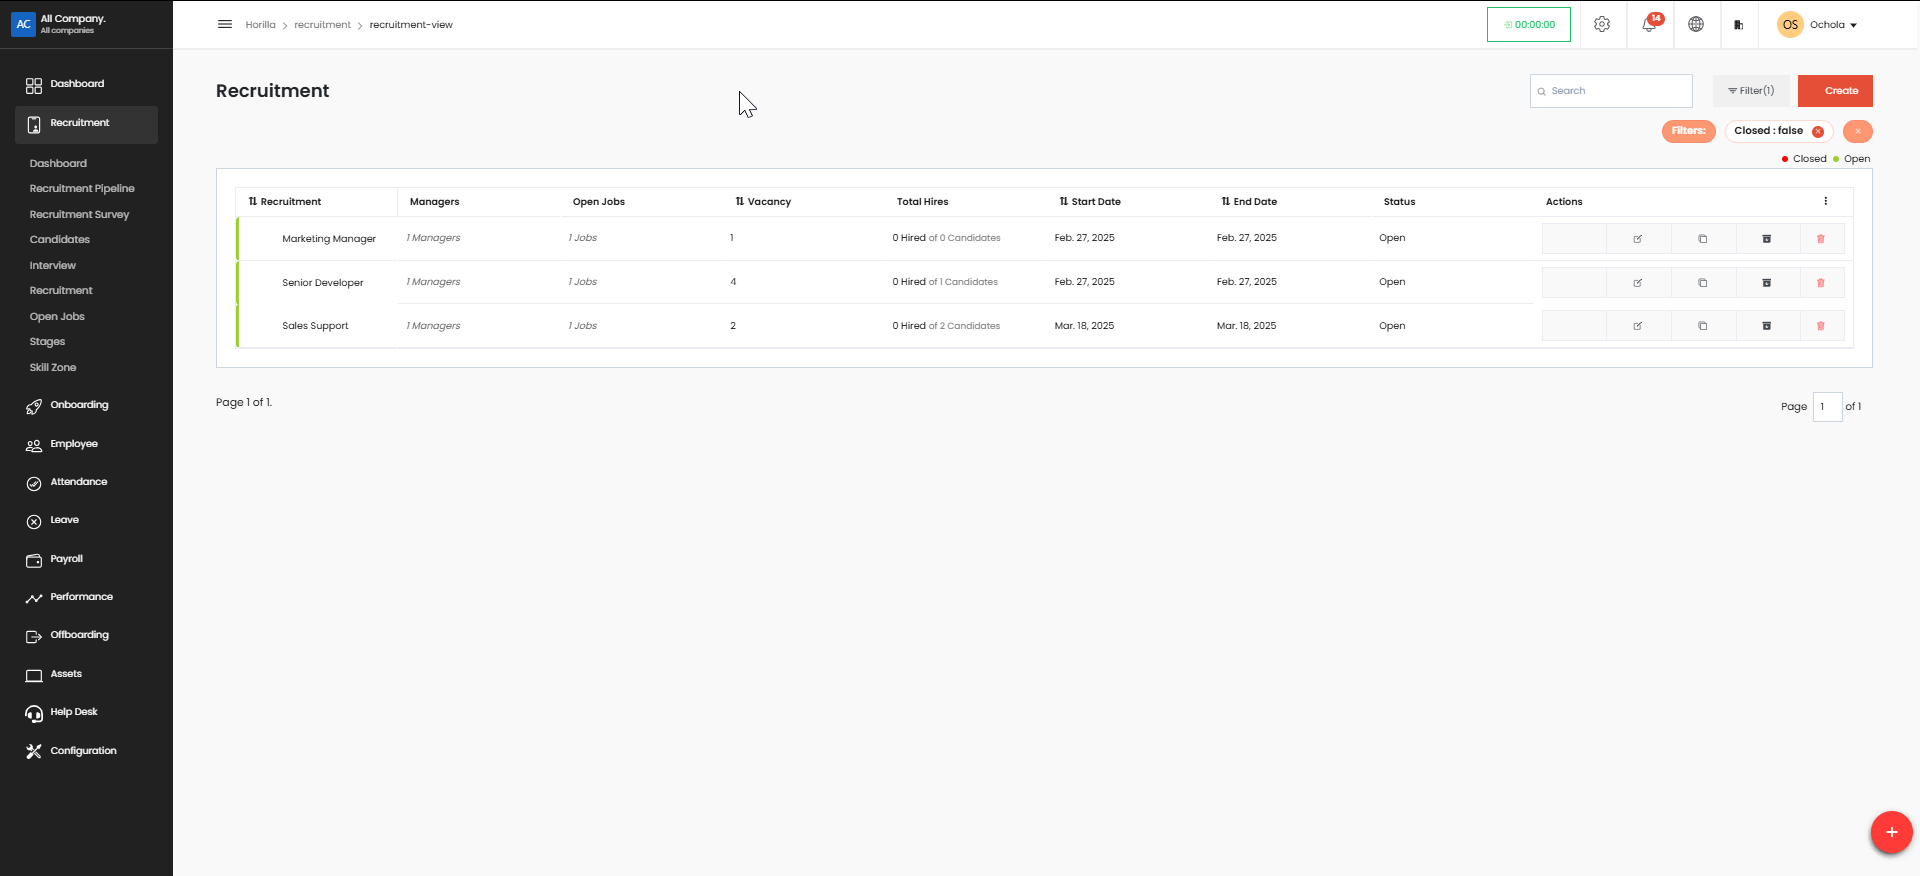
6. Recruitment#
This section serves as the core of the system, allowing recruiters to manage job postings, applicant tracking, and hiring decisions.
Creating a New Position#
Access the Recruitment dashboard through the left sidebar menu
Click the red "Create" button in the top-right corner
Complete the recruitment form with position details, vacancies, managers, dates, and requirements
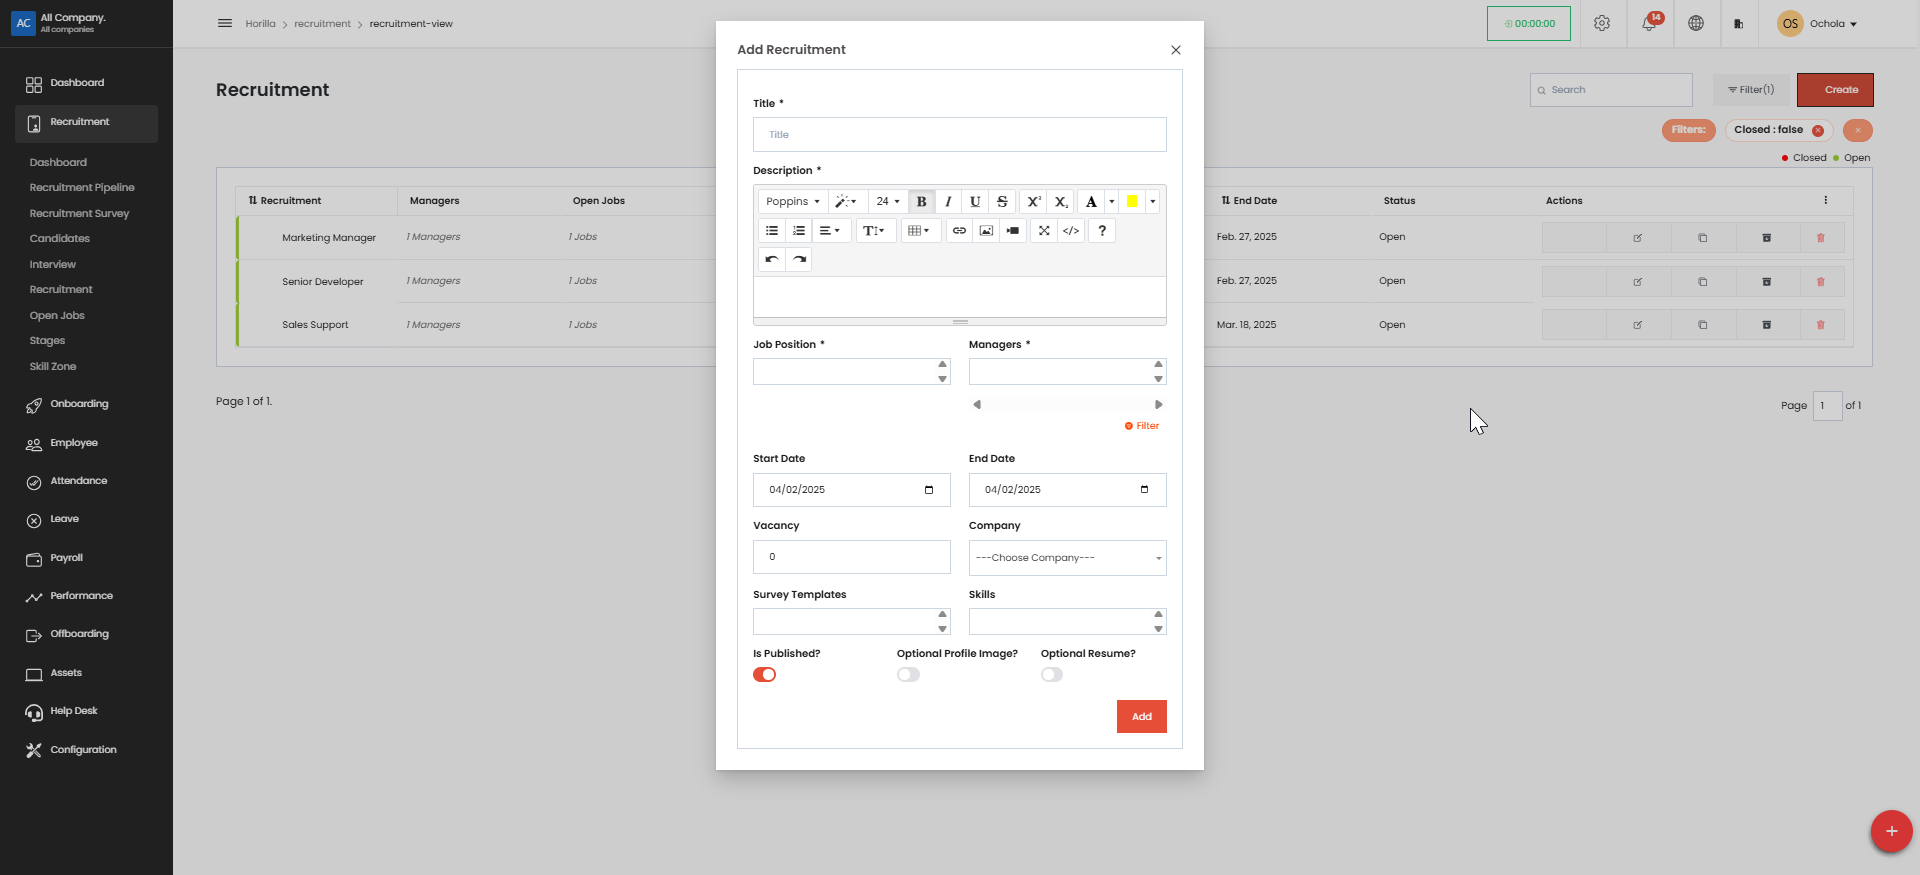
Save the new position to add it to the recruitment table
Managing Recruitment#
Track hiring progress and candidate statistics in the main table
Use filters to view open or closed positions
7. Open Jobs#
Displays a list of all currently available job openings within the organization. Recruiters can post new jobs, edit job descriptions, and track applications.
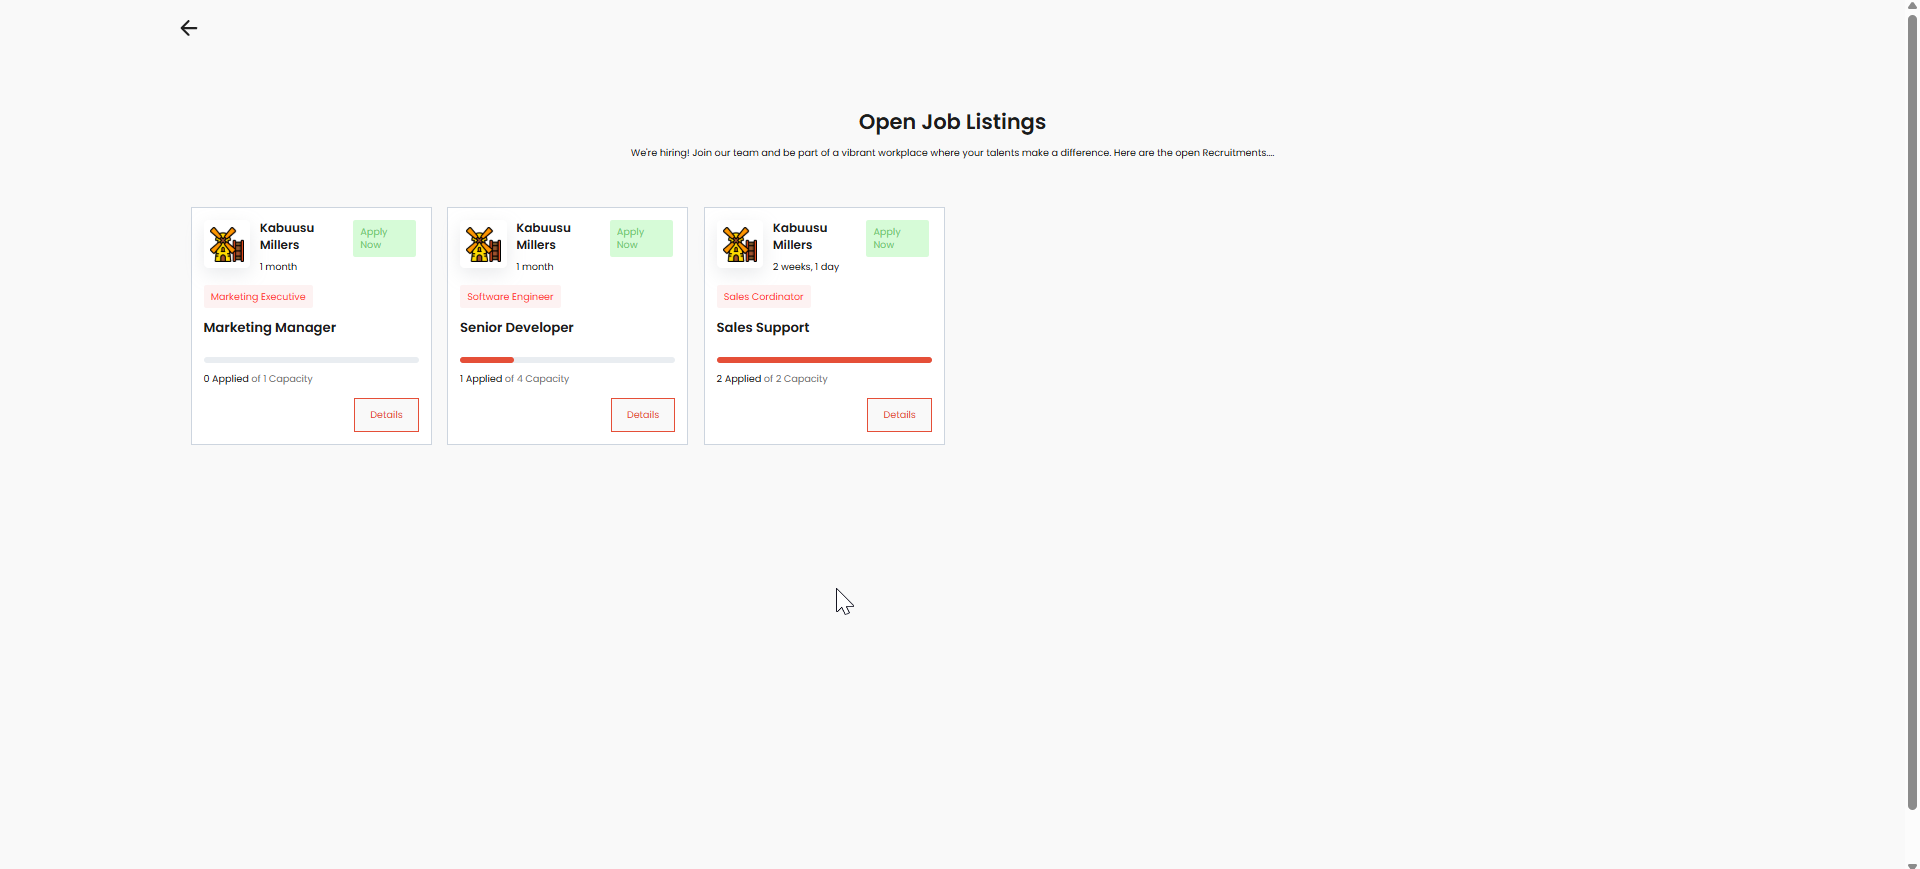 When you click "Open Jobs" from the left sidebar:
You will see a page displaying all current job openings
Each job appears as a card showing position details, posting date,
Apply Now and Details buttons are available for each position
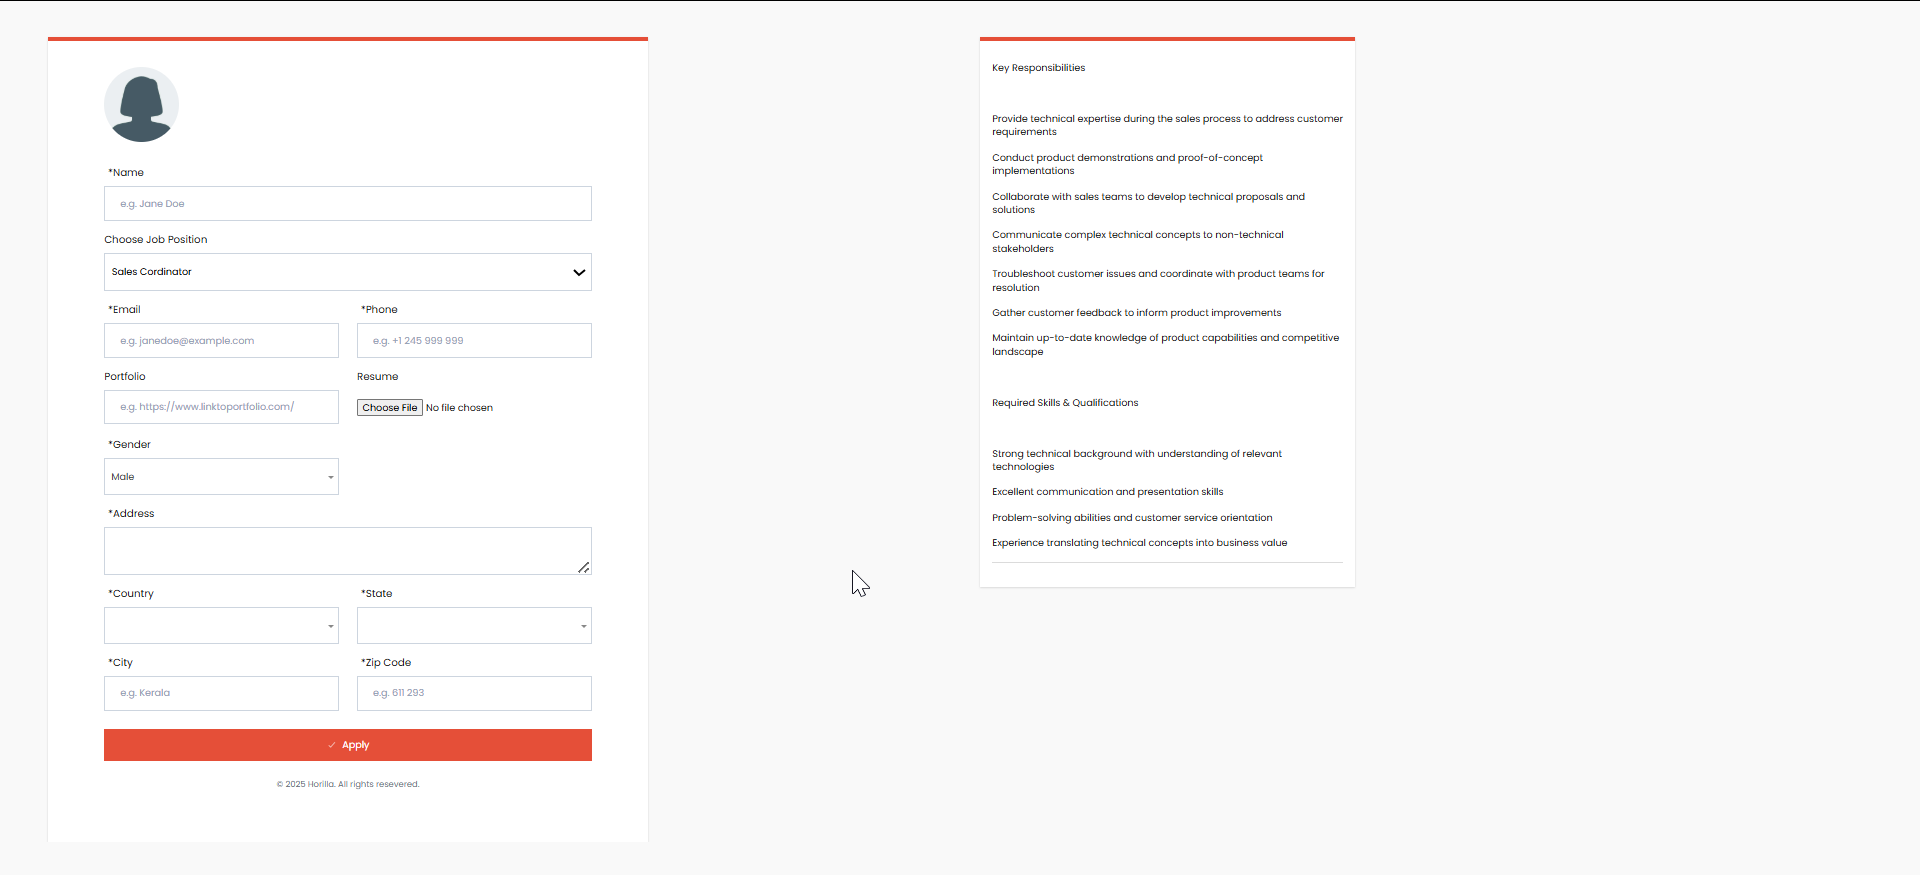
To apply for a position:
Click the "Apply Now" button on the job card
Complete the application form with your personal information
Review the job responsibilities and requirements shown on the right side
Submit your application using the "Apply" button at the bottom
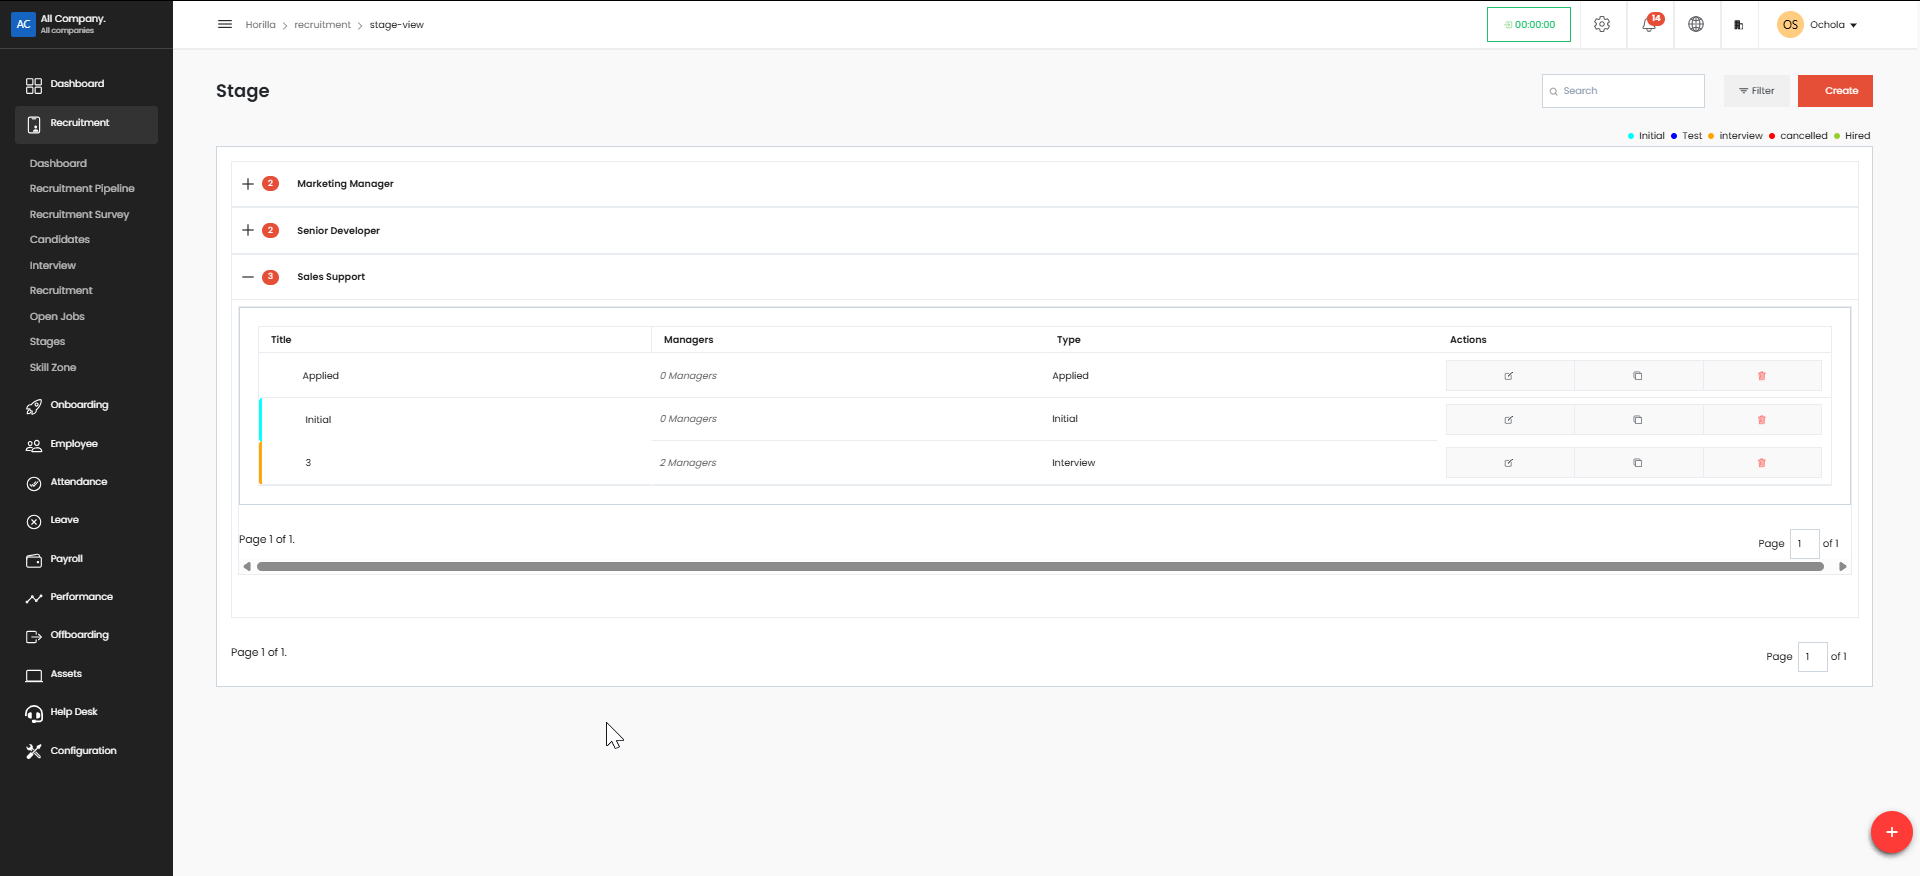
8. Stages#
Defines the various stages of the recruitment process, such as screening, technical assessment, HR interview, and final selection. This helps in structuring candidate evaluations.
Navigate to the Recruitment section from the left-hand navigation menu.
Click on the Stage option within the Recruitment menu.
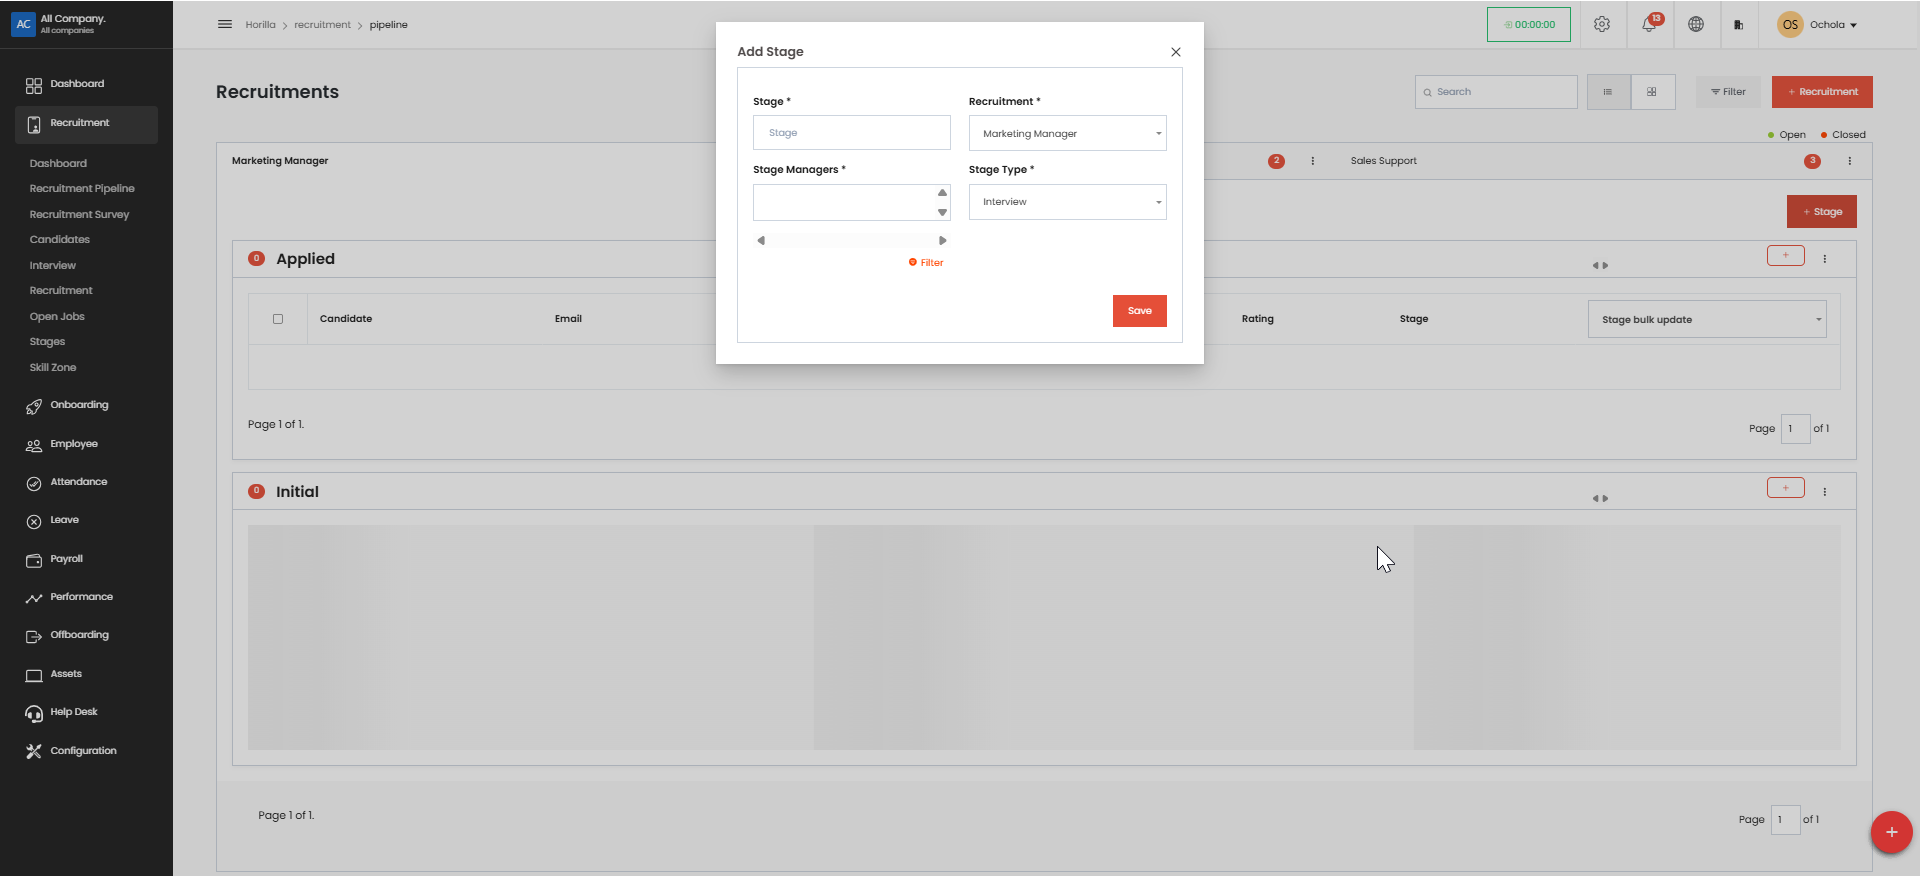
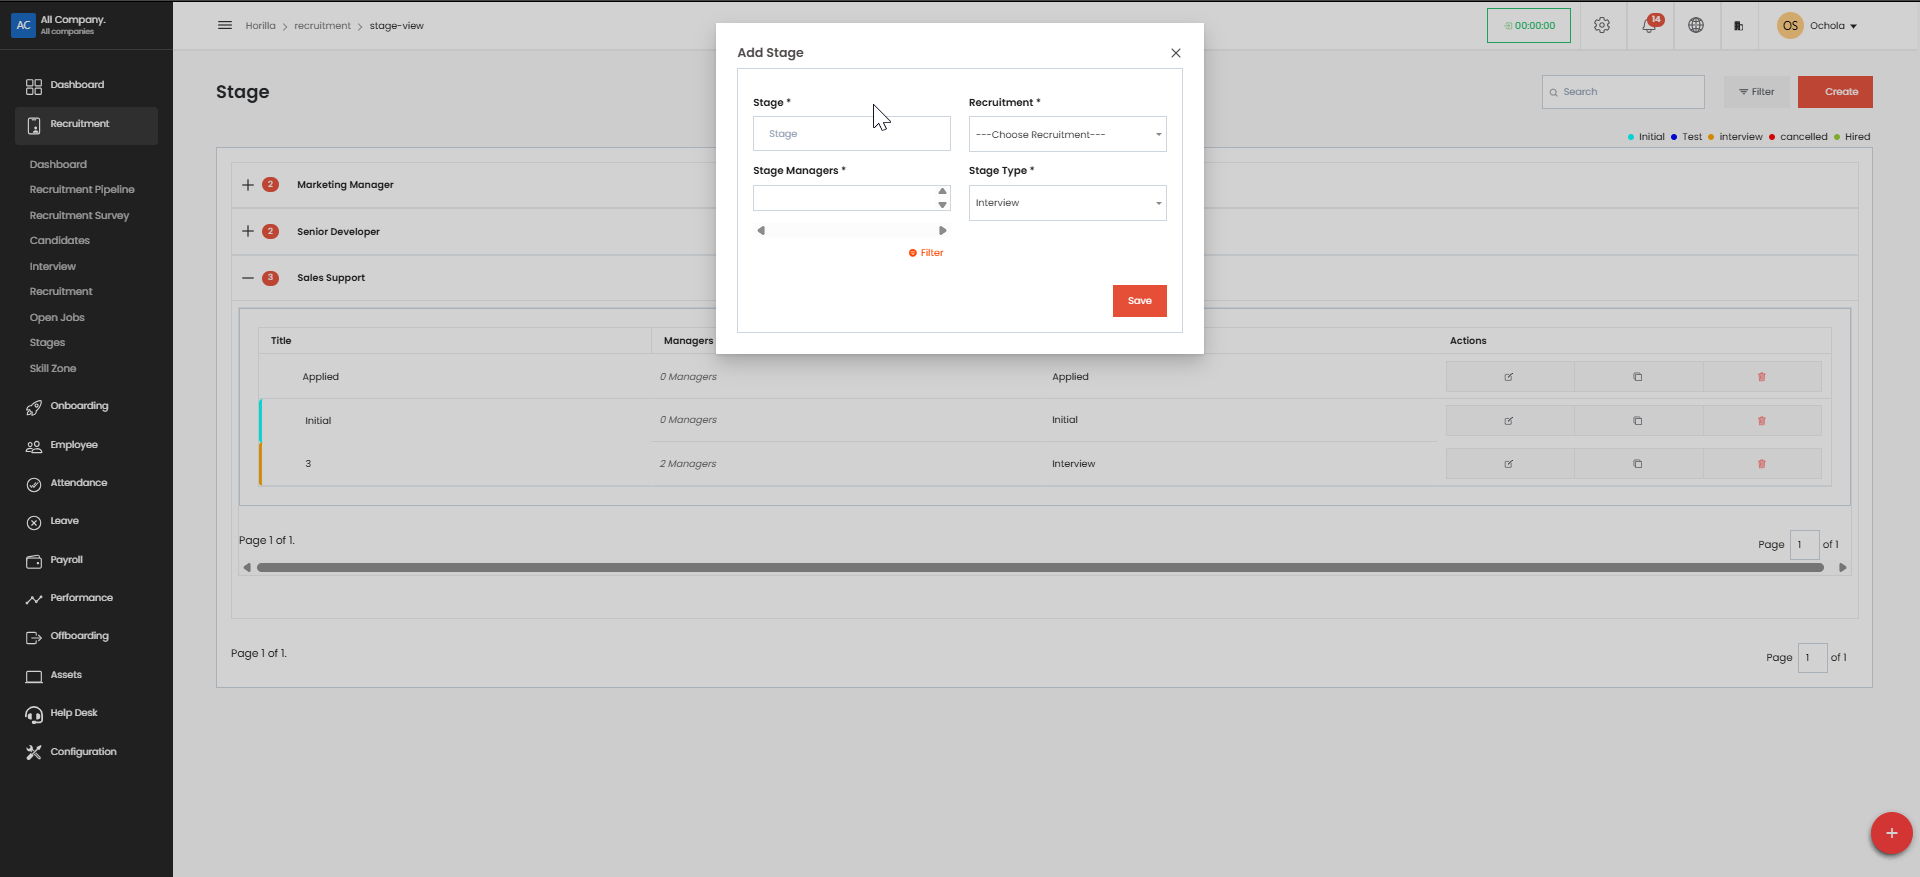
Adding a New Stage:#
On the "Stage" page, locate and click the "Add Stage" button. This will open the "Add Stage" pop-up window.
Fill in the required fields:
Stage: Enter the name of the new stage you want to add (e.g., "Phone Interview", "Technical Assessment", "Final Interview").
Recruitment: Select the specific recruitment process this stage belongs to from the dropdown menu.
Stage Manager: Choose the user who will be responsible for managing this stage from the dropdown menu.
Stage Type: Select the type of stage from the dropdown menu (e.g., "Interview", "Assessment", "Offer").
Click the "Save" button. This will add the new stage to the recruitment process and close the pop-up window.
Viewing and Managing Existing Stages:#
The "Stage" page displays a list of all existing stages with the following information:
Title: The name of the stage.
Managers: The user responsible for the stage.
Applied: The number of candidates currently in this stage.
Actions: Options to edit or delete the stage (if permissions allow).
Filtering and Searching:#
Use the search bar to quickly find a specific stage by name.
Click the "Filter" button to apply filters based on different criteria (e.g., recruitment process, stage manager).
9. Skill Zone#
A repository of required skills for different roles. It helps recruiters match candidates' skill sets with job requirements and identify skill gaps in potential hires.
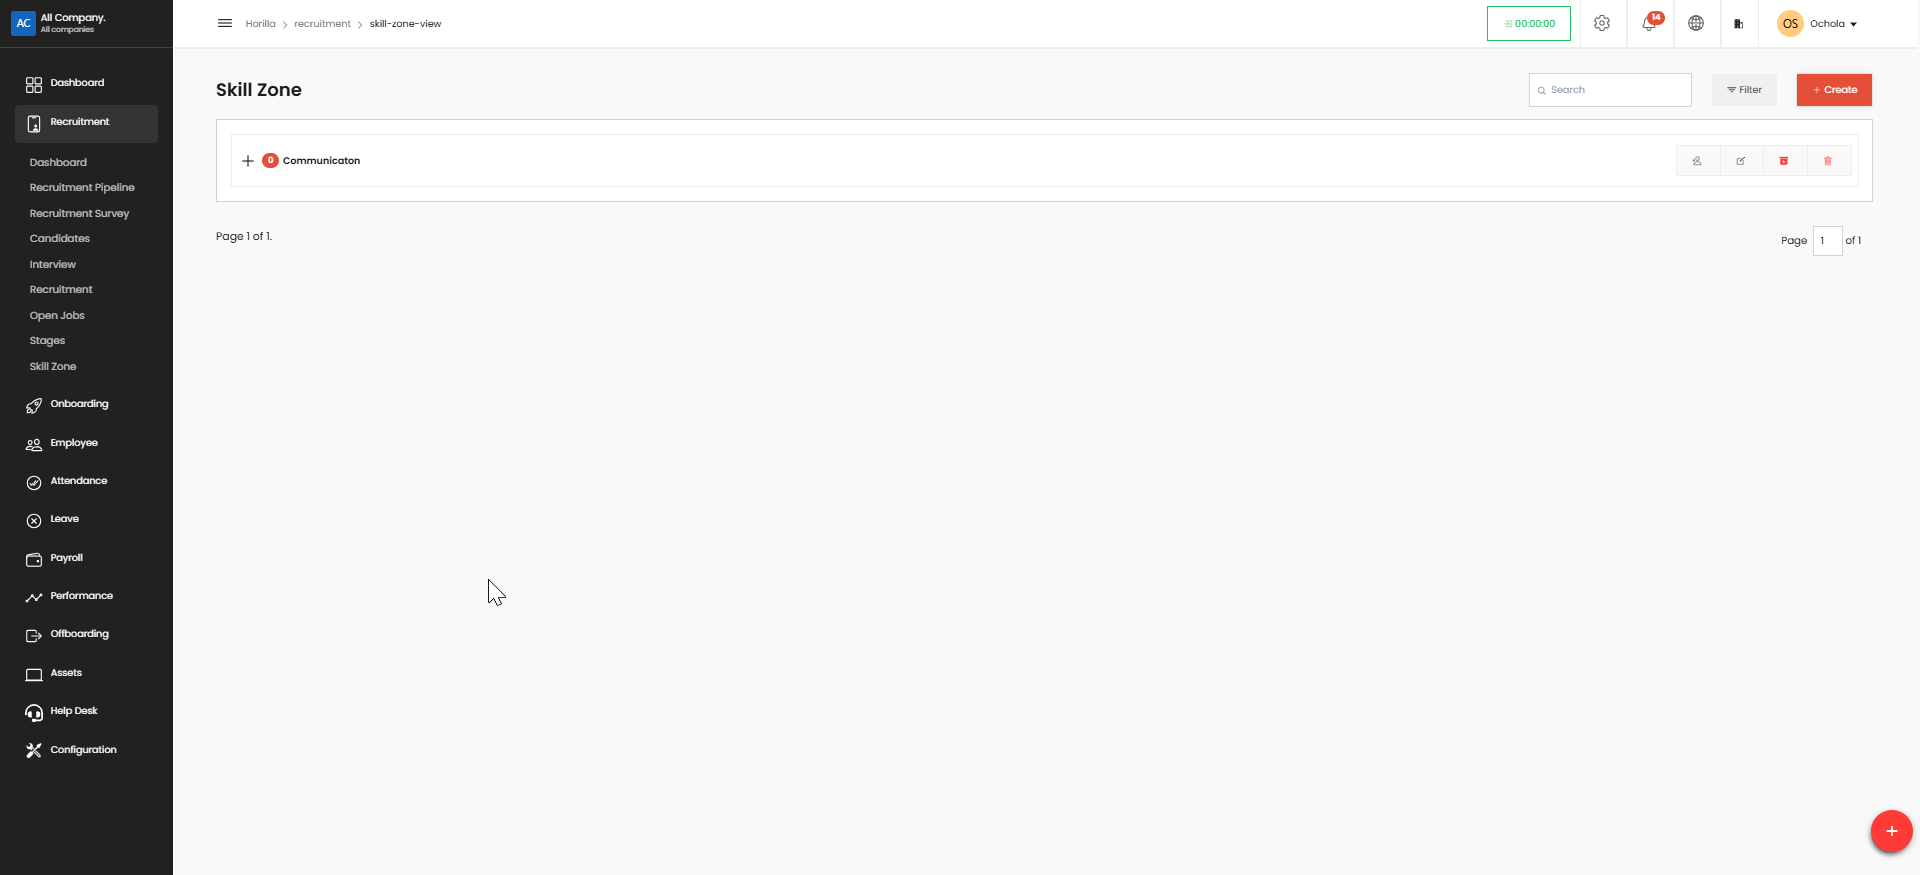
Navigate to the Recruitment section from the left-hand navigation menu. Click on the Skill Zone option within the Recruitment menu.
Adding a New Skill Zone:#
On the "Skill Zone" page, locate and click the "Create" button (located in the top right corner). This will open the "Skill Zone" pop-up window.
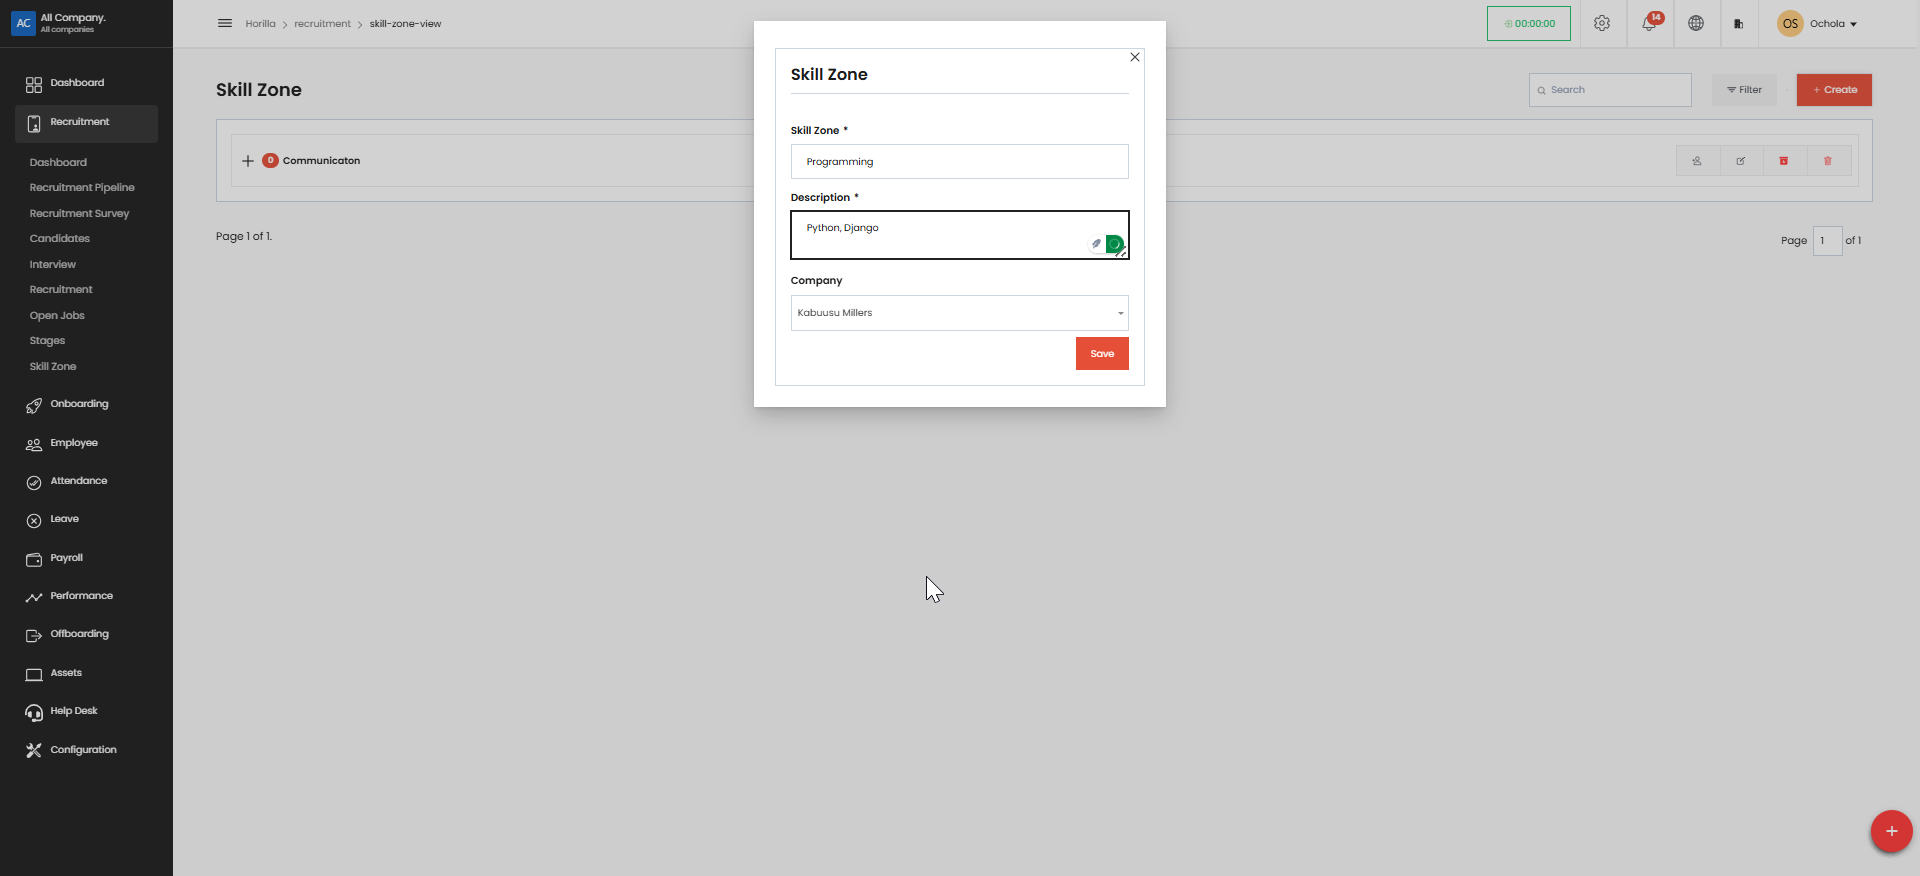
Fill in the required fields:
Skill Zone: Enter the name of the new skill zone you want to add (e.g., "Software Development", "Marketing", "Customer Service").
Description: Provide a brief description of the skills included in this zone.
Company: Select the company this skill zone belongs to from the dropdown menu.
Click the "Save" button. This will add the new skill zone to the system and close the pop-up window.
Viewing and Managing Existing Skill Zones:#
The "Skill Zone" page displays a list of all existing skill zones.
Title: The name of the skill zone.
Description: A brief description of the skill zone.
Actions: Options to edit or delete the skill zone (if permissions allow).
Filtering and Searching:#
Use the search bar to quickly find a specific skill zone by name.
Click the filter icon to apply filters based on different criteria (e.g., company).